Category: crafts

DIY Baby’s First Christmas Footprint Ornament {For Under $2}

Teeny tiny baby footprints are one of my favorite ways to preserve a snapshot of a child’s growth.  I made a sweet and simple ornament for our Pearl girl’s first Christmas using one of her newborn footprints.  It was so easy to make and really inexpensive. Make your own Christmas footprint ornament to celebrate your baby’s first Christmas with the instructions below.

(more…)

For the Kids’ Table: 10 Last Minute Thanksgiving Creative Activities

Will you have a bunch of wee ones underfoot longing to “help” as you prep for Thanksgiving?  Check out these quick and easy kid friendly Thanksgiving and fall crafts to keep the kids’ table entertained while you prep and catch up with your Turkey day guests.  I’ve selected crafts that can be made with things you most likely already have on hand.  I’ve also added a few of my own free printables from Thanksgivings past and a bonus cookie recipe for the overachievers in the group.  Feel free to pin the round up as a whole from this page, but as always with round up posts head over to the original blogs to pin individual projects.

1. Fall Pumpkin Craft for Toddlers and Preschoolers

2. Thanksgiving Hand Print Craft for the Whole Family from Pounds 4 Pennies (We made this one today!)

3. Thankful Toilet Paper Roll Turkey from Staci at 7 on a Shoestring

4. Pumpkin Pie Play Dough from Giggles Galore

5. Thanksgiving Do-a-Dot Free Printables from Crystal and Co.

6. Easy Fall Leaf Garland from Crystal and Co.
7. Sugar and Spice Handprint Turkey Banner from Giggles Galore
8. Free Printables: I am thankful for you.
9. Thankful Prayer Quote with Free Printables
10. And for the overachievers out there: I’m Thankful For Cookies from The Nerd’s Wife

How do you keep little hands entertained during the holidays?

Make a Twenty Minute Tutu for Your Favorite Little Girl {For Less Than $10}

I was a dancer growing up, taking lessons in ballet, tap, and jazz from age 2 til college.  Because of this influence, I have an affinity for tutus in my blood.  I’ve made them before but finally figured out a super fast way to make an adjustable waist tutu for under $10 in about twenty minutes.  Seriously.  This is not a Rachel Ray twenty minutes either, with some assistant cutting strips during the commercial.  You can make one, even if you aren’t crafty.  These tutus can grow with your favorite little girl and make a great Christmas or birthday gift.  You can see we styled it for Christmas with our red and green necklace onesie from Unique Annick.   
Materials Needed:
35-50 yards of tulle (depending on the size of your child)
I use the rolls found in the notions section of the fabric store because they are already cut to the perfect width.  You can find them for $3-4.99 (depending on color) for 25 yards, and use a coupon to get them 40% off.
scissors
1 1/2 yards of grosgrain ribbon in a coordinating color 
(at least one inch thick)
piece of scrap cardboard to use as a guide and mat
Instructions:
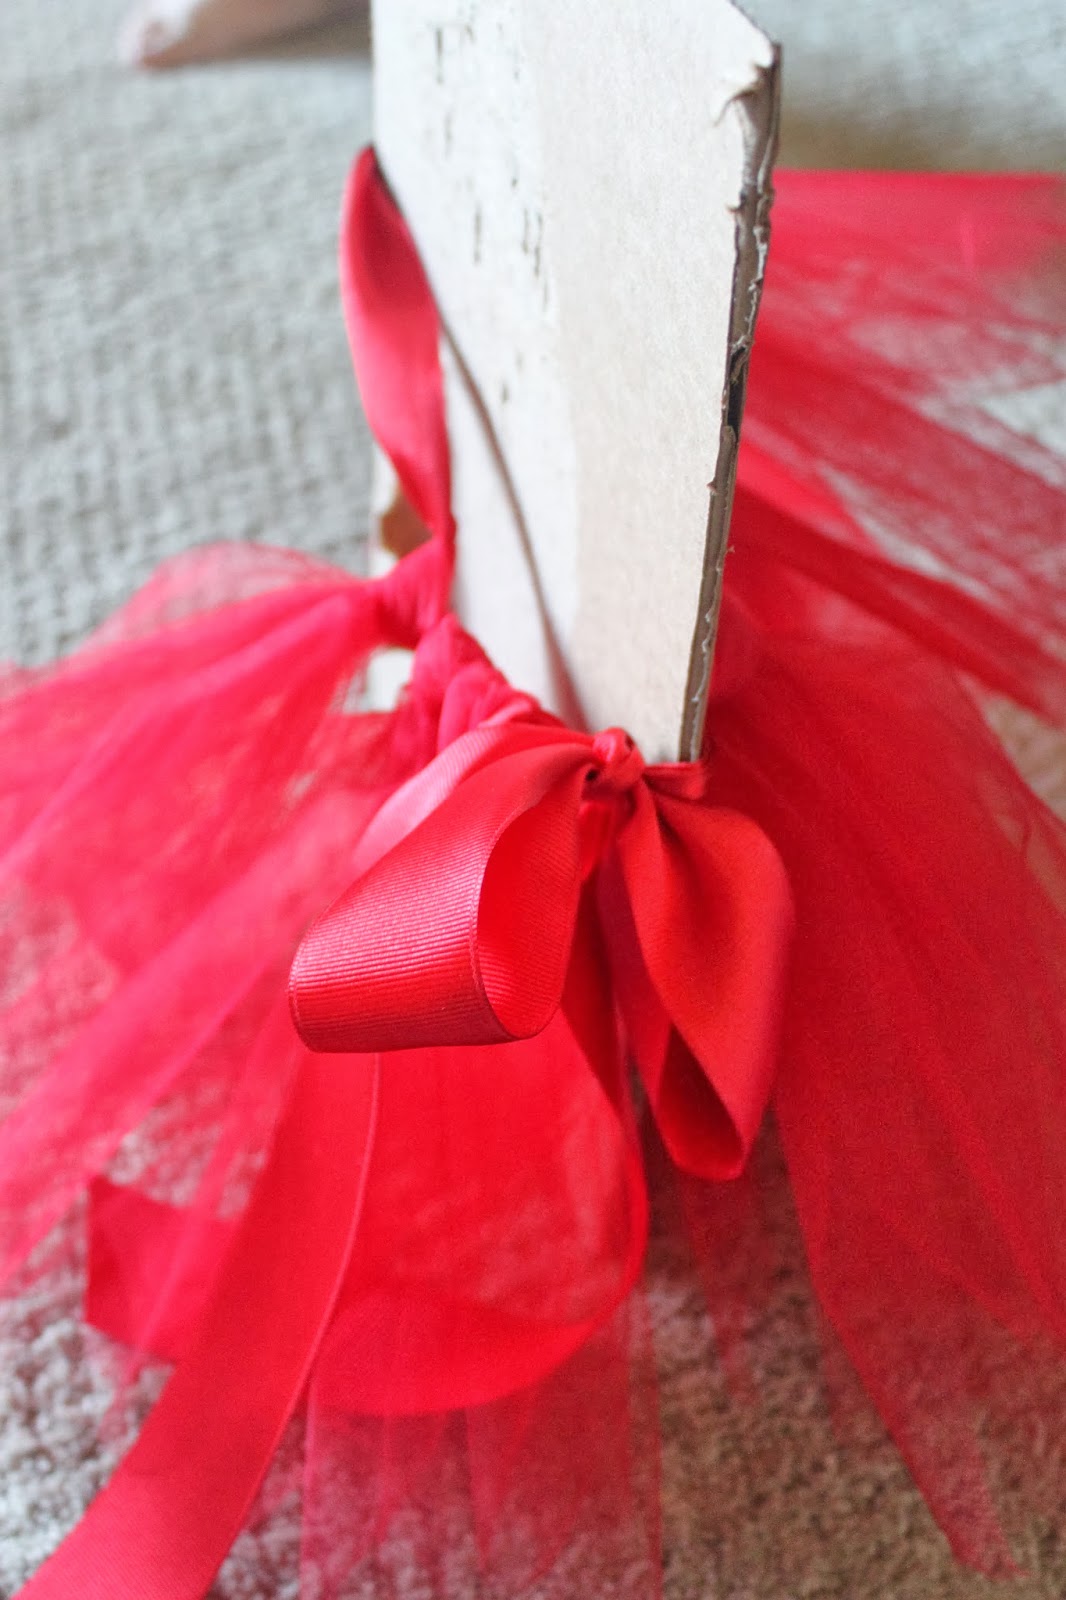
1. Measure your child’s waist or estimate it.  Cut the ribbon to have about twenty extra inches for a bow.  
2. Find the middle of your ribbon and measure for the waist from that point, tying a knot at each end of the waist portion.  
3. Cut your cardboard in to a rectangle to create a guide mat.  For children 0-12 months you’ll want an 8 inch skirt, so make your cardboard 9 inches across to accommodate the knots.  Make a toddler skirt 9-10 inches long, and a child’s skirt 12-14 inches long.  Just add an extra inch to the cardboard for whatever size skirt you need.
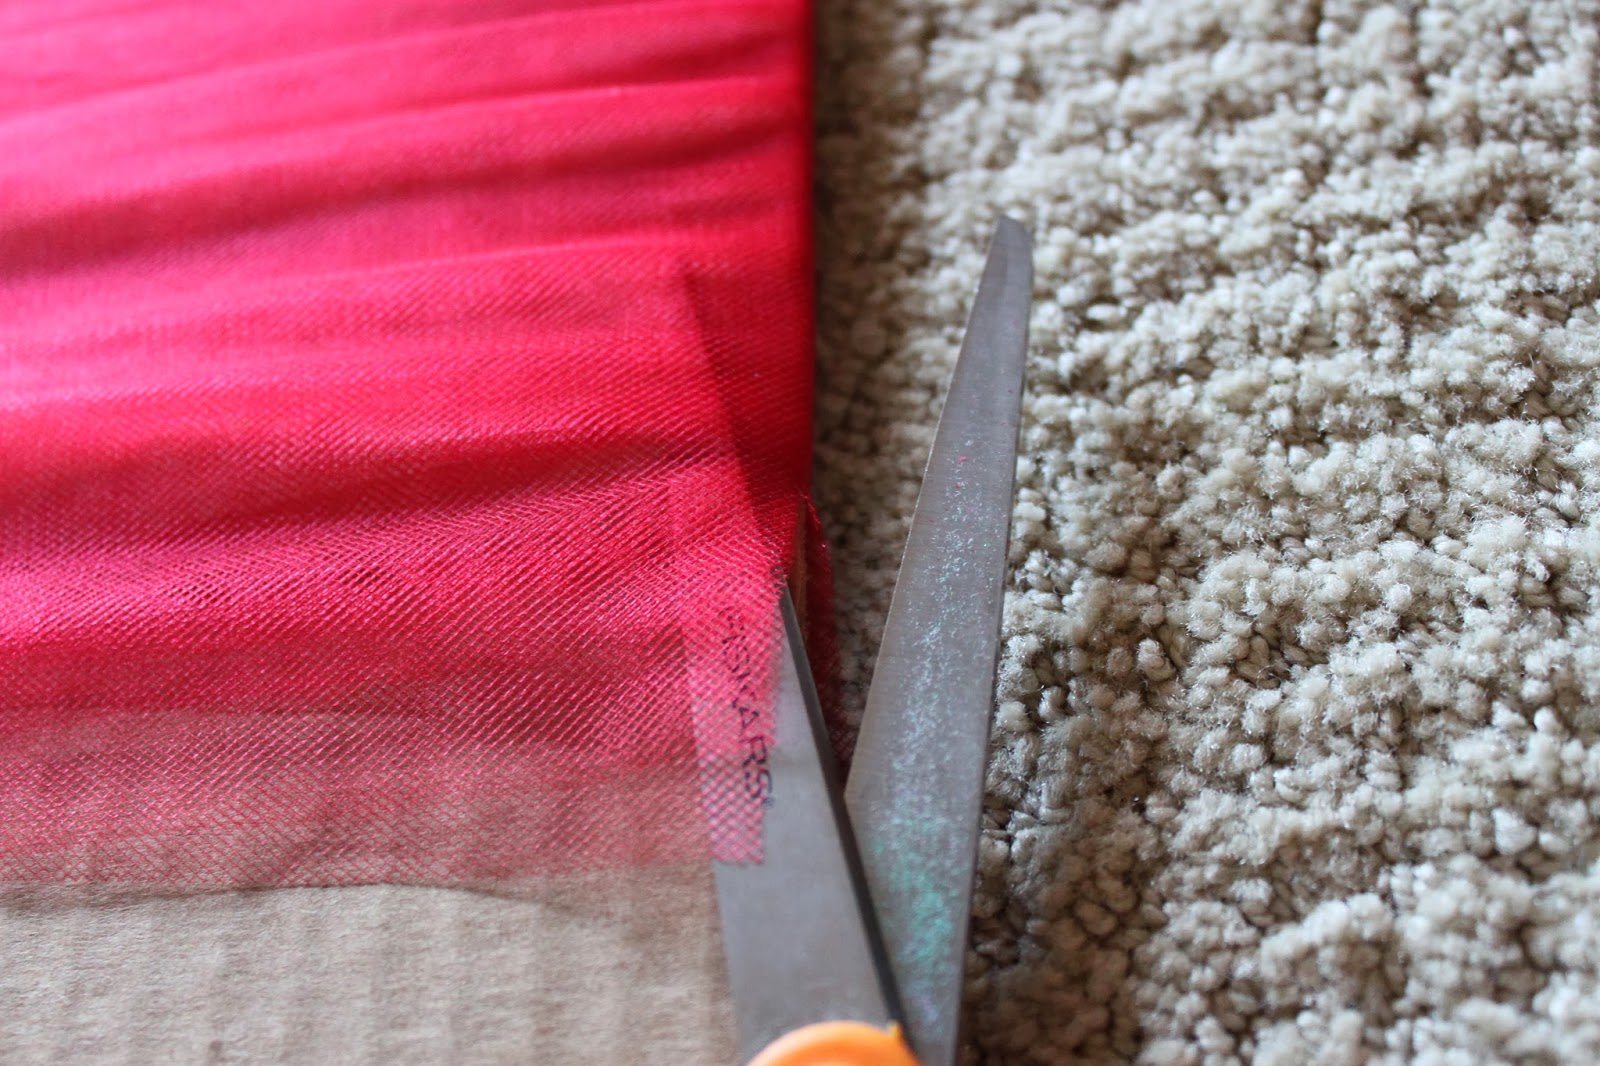
4. Wrap your tulle around the cardboard guide until it is almost too thick to cut.  Cut across one side creating 17 inch strips (using the 0-12 month size as an example).

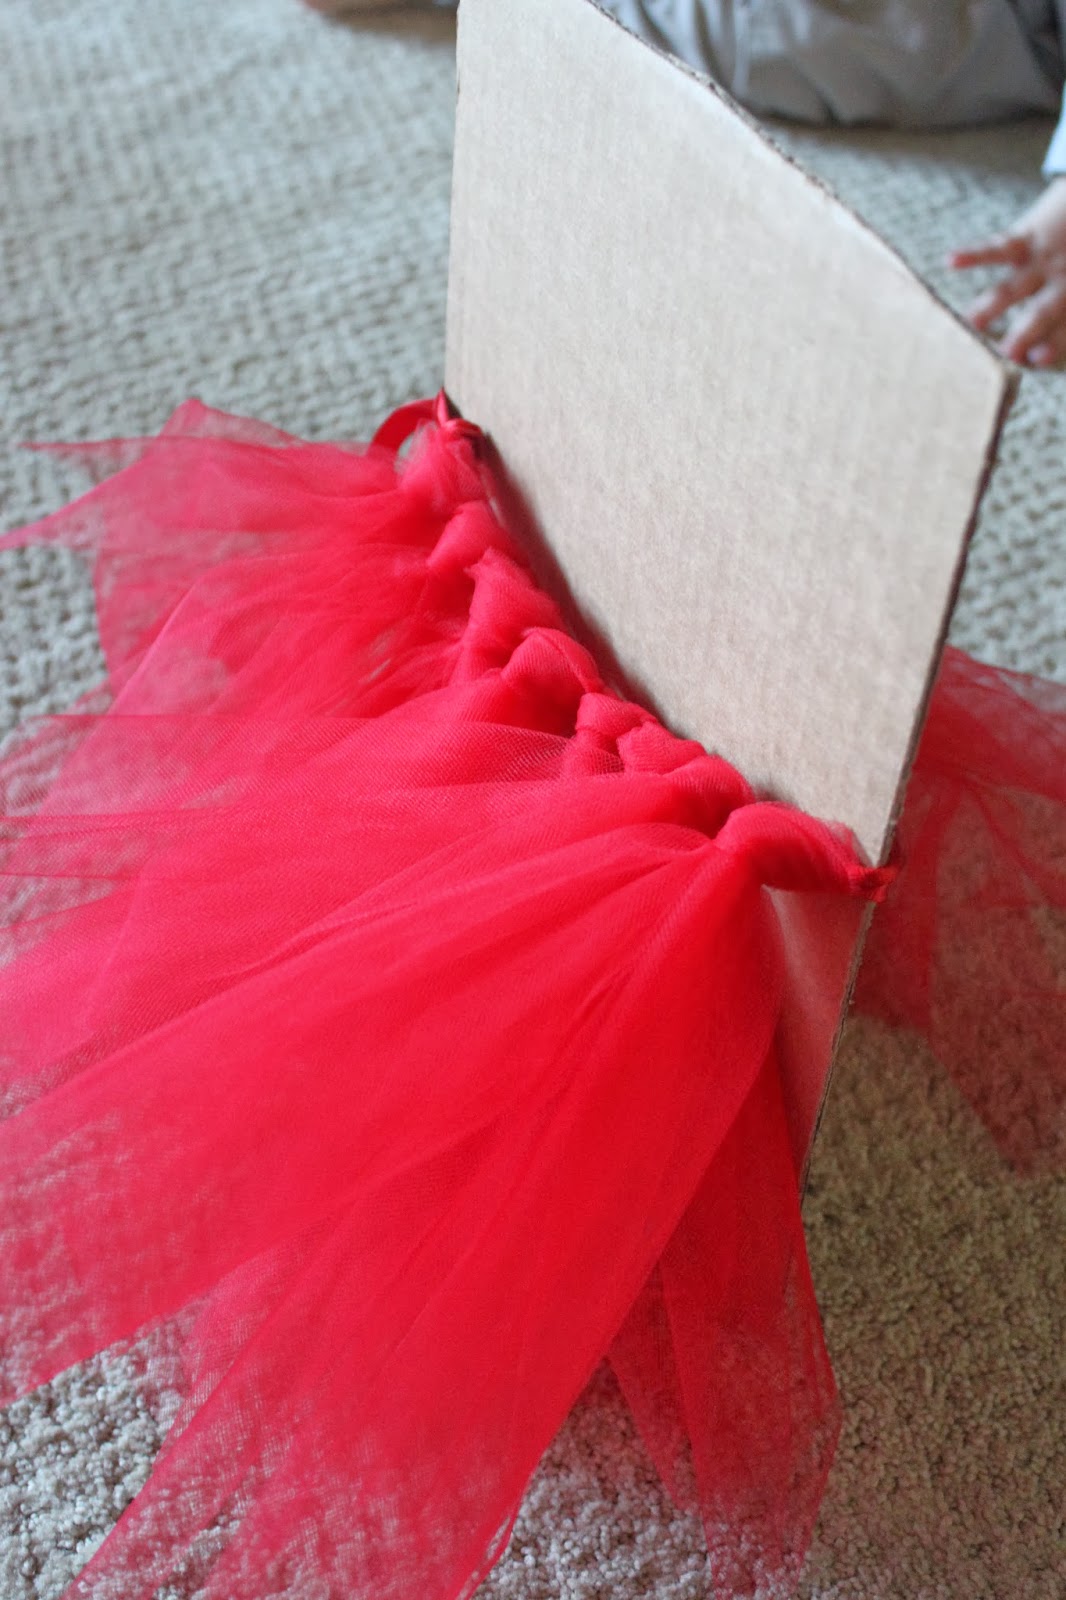
5. Tie your ribbon around the cardboard to make your life easier.  
6. Take three pieces of tulle at a time and loop over the ribbon, then bring the ends through the loop as shown below.  Repeat until your skirt reaches its desired fullness.  Be sure to pull the knots tights and then push them together tightly. 
7. Remove your finished skirt from the guide and fluff it up.  You’re done! 
Hopefully you can knock this out while watching a 30 Rock rerun and have a fabulous tutu gift for under $10.  

If you use this tutorial to make a Twenty Minute Tutu, please share your finished product on my Facebook page.  I’d love to see it.  
I’m always trying to find ways to create in the short amount of free time I have.
What’s your best craft shortcut?

Painting Pumpkins with Toddlers

  Painting pumpkins is the perfect way to let your toddlers decorate the gourds of the season with out knives or messy pumpkin guts involved.  It is simple and an be pretty mess free if you do it just right.  The pumpkins turn out really pretty and don’t rot instantly like a carved one.  Want to try it?  Here’s how we do it…
Pumpkin Painting Instructions:
1) Go outside and set up a little station cleared of anything that might get ruined.
2) Put a blob of each color of washable paint on a piece of construction paper.
3) Show your child what to do, and then let them go for it.  If they don’t like the sensation of paint on their hands, foam brushes work well.
4) You can use painter’s tape to tape off designs on larger pumpkins, or leave well enough alone and drink your coffee.
5) Leave your pumpkin out to dry for several hours.  Throw away your paint paper, or save it for this project.  Wash down your station with a wet rag and wash your child’s hands.  You’re done!  Don’t you feel festive?
The Bear is so proud of his masterpieces.
We actually did this on two different days and it kept him entertained for quite a while.  Fine motor skill building is the best entertainment.
Have you decorated pumpkins with your wee ones? What techniques do you use?

An Easy Fall Pumpkin Craft for Toddlers and Preschoolers

Crafting with toddlers and preschoolers can be a bit of an adventure, but it is great for their fine motor development and can kill major chunks of time with no tv involved.  This one is crazy easy, turns out really cute and festive, and will give you about 20 minutes of peaceful fine motor practice.  Go for it.  Everybody needs a festive pumpkin to hang on the fridge, and your little one will be so proud of their handiwork.
Materials Needed:
construction paper or cards tock
scissors
one sheet of orange tissue paper
glue stick or spray adhesive
Directions:
1) Trace a basic pumpkin shape on to your card stock or construction paper and cut it, or just cut it out freehand with scissors. It doesn’t need to be perfect.  An oval with a stem will do.
2) Let your toddler tear the tissue paper up in to tiny pieces.  Really let them get in to it.  To contain this part of the process I put Bear in his art box and let him go to town.  He LOVED it.
3) Spray your pumpkin shape with a light coat of spray adhesive or cover with your glue stick.  I recommend the spray because it won’t get your little one sticky and holds the tissue very effectively.
4) Show your wee one how to stick the pieces of tissue on to the pumpkin.  Encourage them to cover the whole thing.  Back away slowly and watch them work.
5) Take a photo of your babe with the finished product and then pat yourself on the back.  Craft accomplished.  Mischief managed.
What’s your favorite fall craft for little ones?


Easy DIY Instagram Magnets {Make 6 for $3}

I heart Instagram.  For ages I used it just to add fun filters to my phone photos but finally started using it socially a few months ago.  Now I’m addicted.  You can follow me on Instagram here.  The big drawback of taking pictures on your phone has always been the difficulty in printing and displaying them in real life.  My friend Sarah who blogs here shared a tutorial for creating Instagram magnets using the Walgreens app, and I thought it sounded like a fabulous idea.  When I went to Joann’s to looks for magnet strips, I found something exciting – a whole magnetic sheet!  I’d never seen one before and thought it would be perfect for this little project.  I used a coupon at both Joann’s and Walgreens so the total cost of this project was only $3 for 6 magnets.  If you print off your pics in a 3×3 format instead of the 4×4 using the app, you could get 12 magnets out of a sheet instead of 6.  Bonus!  Here’s how I did it:

Materials needed:
1 8×12 magnetic sheet (use your mobile craft store coupon)
6 4×4 Instagram prints (or 12 if get them printed 3×3)
Exacto knife or box cutter
piece of cardboard

Make it:
Get your pictures printed through the Walgreens app, or format and print yourself at home.  Strip the adhesive backing off of your magnetic sheet.  This is the hardest part.  That backing was not trying to come off for me.  Lay out your photos on the magnetic sheet.  Put a piece of cardboard underneath to protect your work surface from your cutting implement.  Cut them out.  Done.

These make a fun and very personal gift.  I gave the set of 5 to Jed for Father’s Day to take to his classroom, and saved one for our fridge at home.  My goal is to make these once a month so that we have our Instagrams on display in real life and have a festive fridge.

How do you display your phone pictures?

Be sure to follow me on Instagram at Bare Feet on the Dashboard.  

I love linking my ideas at these blog parties.  Click the links to check them out and find crafty inspiration.  If you’ve never visited a blog party, you will be blown away by the creativity shared and imaginative ideas.
Monday: CraftOManiacMad in CraftsIt’s So Very CheriSew ChattyThe Girl CreativeKeeping It SimpleC.R.A.F.T.Boogie Board Cottage, and Sumo’s Sweet Stuff   
Tuesday: Raising 4 PrincessesThe Kurtz CornerHope StudiosToday’s Creative BlogCoastal Charm, and New Nostalgia 
Wednesday: The Trendy TreehousePolka Dots on ParadeLil Luna, and The Thrifty Home
Thursday: All Things with Purpose, Somewhat SimpleThe Shabby Creek Cottage, and House of Hepworths
Friday: Sugar and SpiceKojo Designs, and The Shabby Nest
Weekends: Tatertots and Jello, Serenity Now, and Candace Creations 

Fun and Frugal Fourth of July Inspiration Round Up

I love everything about the 4th of July, fireworks, bbqs, red/white/blue color palettes, and watermelon.  I also love an inspirational idea, don’t you? I found some super cute, fun, and frugal ideas to share with y’all inspire us for Independence Day.  Each of these projects is very cheap to make and all are pretty quick.  Check out the projects below, get inspired, and visit each blog for the full tutorial.  All photos are by the original bloggers and used with permission.  If you decide to pin an individual project (and I hope you do) please pin from the original poster.  Let’s get ready for the 4th!
Patriotic Ice Cream Sandwiches from Kleinworh & Co.
Genius, pure and simple.  

Star Garland from Crazy Little Projects
Super cute, and I think I could make it even with my limited sewing skills.

DIY Ric Rac Flag T-shirt or Onesie from Our Good Life
I’m a sucker for ric rac and grosgrain.
American Flag Yarn & Button Wreath from The Cellar Door Stories
This one is so clean and simple, but still festive.
Red, White, and Blue Tin Can Luminaries from Days of a Domestic Dad
Such a cute idea and a perfect project to do with your kiddos.
Festive Firecracker Bows from Craft Quickies
The cute is exploding all over her head, and I love it.
DIY Flag Tank Top from Naturally Nesters
Don’t have a 4th of July outfit? Make one in under an hour.  
What’s on your summer crafting list? 

Frugal and Fast {Last Minute} Father’s Day Craft and Card Round Up

As the Queen of Procrastinators, I found myself searching Pinterest for Father’s Day craft ideas this week in a desperate quest to find that perfect project.  I found a few great ones to share with you if you are in the same boat.  It’s not too late!  All of the projects below can be done at the last minute for very little money, but will still make that special Daddy feel loved.  I’m still wavering but I think I’m going with the chalkboard cookie jar and some Instagram magnets.  If the magnets work out well {fingers crossed} I’ll post a tutorial soon.  If you choose to pin this post (and I hope you do) please use the image above, and pin the projects from their original sources.  Both the photos and text below are linked to the original bloggers with permission.

DIY Chalkboard Cookie Jar from City to Sticks
Easy and Reusable

Rustic Wood Free Printable Father’s Day Card from Agus Yornet
Available in English and Spanish!

Free Printables from She’s Kinda Crafty
All you need is a printer and a pen.
“I Love You to Pieces” Goody Jar from
Scrappy Mel
This one is super fast and easy.
S’mores Gift Basket and Chalkboard Frame from Gallamore West
What do you have planned for the father or grandfather in your life this week?

Let’s Make an Easter Basket – A Tutorial

I love the joy of Easter and the new life it brings.  You can read some of my other Easter posts here.  Last year I looked long and hard to find the perfect Easter basket for the Bear, but all the options I loved were too pricey.  I had paint and ribbon on hand and decided to make a frugal, durable, cute Easter basket. I purchased a peck size basket at Hobby Lobby for about $4.  Here’s a crappy image of a peck basket from Amazon so you can see what it looked like before.  I totally forgot to take before pics.

I painted the basket using Rustoleum Painter’s Touch Satin in Heritage White and a sponge brush.  It took two coats to really cover the wood.

I used my glue gun to line the inside and outside with satin ribbon leftover from our wedding.  Yes, we’ve been married almost 5 years.  Yes, I probably over bought on wedding ribbon.  Oh well.  The ribbon serves two purposes.  It looks super cute and covers up the rough edges and staples that hold the peck basket together.

I tied satin ribbon into bows on each handle and glued them in place.  I’m sure these will have to be replaced someday but they are holding up well so far.

I painted the Bear’s name onto the basket using a navy blue paint pen.  I am not skilled in the handwriting department so it took a few tries and a few wipe off/repaints.  I finally went with dot letters because they are very forgiving and look super cute.  I highly recommend this method if you struggle with paint pen writing like I do.

We use ribbon as Easter grass after seeing the idea on Young House Love and not wanting to find the plastic stuff everywhere.  My dad hates the plastic Easter grass with a passion (4 kids = a ton of Easter grass clean up over the years) and loves this idea.  I used two rolls of green ribbon from the dollar store and just unrolled them completely and put them in the basket.  The clean up is incredibly easy.  You just pick up each long piece of ribbon and throw it back into the basket.  We’ve made a game out of tossing the ribbon and eggs back into the basket after Bear inevitably dumps them out.

The Bear loves his basket even more this year.  He has carried it all over the house and loves playing with the ribbon and plastic eggs.

What’s your favorite Easter candy?
I’m obsessed with Cadbury eggs.


My Top Five Favorite Pins From Pinterest

I’ve had a love affair going with Pinterest for a while now.  After using 2 of my all time favorite pins to make my lunch today, I thought I should share them with you.  If you aren’t on Pinterest yet, do it now.  If you are, come follow my pins here.  Leave your Pinterest name in the comments section and I’ll follow you back.  If there is a pin that you absolutely love AND have actually used, please leave a link in the comments section as well, so we can all get in on that action.  Check out my top five pins that I’ve actually USED successfully below.  I’m not using the pictures from the owners’ posts because that feels a bit shady.  The first link goes directly to the original post so you can pin from there, and the second link goes to that site’s homepage.
Let’s count ’em down.

#5 Cheap and Easy Balloon Garlands from A Girl and A Boy
I used this little trick for The Bear’s 1st birthday that I still haven’t posted about.  It was in May.  Hopefully I’ll get around to it before he turns 2.  Basically you blow up a bunch of balloons and thread a string through the ends, then hang that string up in a garland like fashion.  So cool, so cheap.  Bear LOVED it.  I loved that it was easy and festive and cheap.

#4 Avocado Chicken Salad from Becoming Betty
I never would have though to add avocado to my chicken salad even though I love both things with my whole heart.  Homegirl is a genius.  I will say it still tastes fine without the green onion and cilantro, because I had neither of those things on hand when I made it today for lunch.

#3 Giant Photo Prints for Cheap from Sugar Bee Crafts
You take a jpg of a photo to an office store and ask for an engineer print in black and white.  They give you a 3×4 foot print of your photo.  You pay them $3-6 and feel like a genius, take that sucker home, and mount it on the surface of your choice.  I made one of these for my living room and you can see the results here.  I love it and it only cost about $5.  You can read Sugar Bee Craft’s second effort (mounting on plywood instead of foam board) here.  This is such a great, cheap way to get a big impact.

#2 Free Printable Customized Monograms from For Chic’s Sake
Like any good southern girl, I love a monogram.  For Chic’s Sake offers free printables you can customize with your colors and initials.  I printed one off for our room, one for Bear’s, and will do one for Mini Bear as soon as we decide on a name.  Super cute and free, you can’t beat that with a stick.

#1 Use your Kitchen Aid Mixer to Shred Chicken from Simply Healthy Family
This has absolutely changed my life, seriously.  I told my mama about it, and it changed her life, too.  The post isn’t even about that, it’s about making BBQ chicken sandwiches.  I use this all the time.  I used it today for lunch while making the aforementioned Avocado Chicken Salad.  I just boil my chicken breasts and then toss them in the mixer.  Genius.    

I would love to hear about your favorite pins.  Tell me about them in the comments section or over email.