Category: decorating

The Nursery Part 2: Hand Painted Letters

Can you imagine my surprise and delight when my sweet and creative friend Crystal presented me with these hand painted letters at my Little Rock baby shower?  She matched the paint colors to the bright, vintage theme of the nursery, and attached matching ribbon for hanging.  She even gave me all the leftover ribbon.  Amazing.  Here’s one of the inspiration quilts to compare the color scheme.  

I love how each letter is unique.  I hung them above the closet to divert attention from the mirrored door and weird gold trim.  Oh, rent house weirdness…

You can see part 1 of the nursery here.  
Stay tuned for more tomorrow.  
I’m sharing these fun letters at some great parties you can find on my right sidebar.  Click away and join the fun.  

The Nursery Part 1: Bright and Vintage Inspired

I searched high and low and all over the internet for inspiration for Baby Bun’s nursery.  I picked out bedding at Babies R Us, then ditched it in favor of a set from Target.  Then I remembered my great grandmother’s quilts and decided to go in a completely different direction.

I used the colors in these quilts for inspiration, and decided to go with a brightly colored vintage theme.  One quilt hangs over a spare chair that will be replaced when we move the glider from the living room to the nursery.  The other covers the full size guest bed that lives in half the room.

We used a lot of handmade furniture that my husband crafted, including the headboard and two shelves.  One of the shelves has several cubbies that are filled with baby things stored in cute buckets painted by my friend Crystal.  

The little birdie is a tap nightlight, which will be super handy above the changing table.  In another cubby lives Paulo the Piggy Bank that I painted with some of my WyldLife girls, and one of the corsages from my baby shower.

More vintage inspired touches include a trio of mod podged doily paintings that you can read about here, and mason jars filled with brightly colored pinwheels.

Glow in the dark sheep live atop the cubby shelf, while toys and a diaper cake begin to fill the play corner.

OMGiant Belly…

Jackson enjoys the fluffy rugs that used to reside in our bedroom.  They help to mask the ugly rent house carpet.  We can’t cover up the rent house mirror doors, so I’ll use them to give you a preview of the rest of the room.  Come back this week to see the rest.

Where do you find decorating inspiration?  
I’m sharing this post at some great parties.  
Check them out on my right sidebar and join the fun.  

A Ribbon Mobile for Baby’s Nursery

We are hard at work on Baby Bun’s nursery, and my favorite part is the decorating.  I saw a ribbon mobile I love at Pottery Barn, but it was almost $70.  I decided I could make one pretty easily for a lot less.  I piled up the coupons and went to Hobby Lobby.  Ribbon was half off.  Score!  I bought ten different colors of ribbon and a wire wreath frame.  I already had paint for the frame and craft glue.  The wreath was that floral dark green, so I painted it light aqua.  The aqua repeats itself throughout the nursery, as do most of the other colors.  As you can see we did not stick solely to the traditional gender neutral colors of green and yellow.  I can’t wait to show you all of the nursery when we get done.  

 At first I cut the ribbon into strips, but they were way too long.  I wanted to make sure the baby couldn’t grab it even when he/she is able to stand in the crib.  I cut each piece in half and it was perfect.  Check out the massive pile of ribbon.

I glued strips around the inside ring first. I folded each strip over and putt a dot of craft glue on it, then held it in place for a few seconds.  This was effective but a bit messy.  I think you could double the length and knot it in half for a glueless mobile.  After the inside ring, I decided to skip the two middle rings and go straight to the outside ring.  I glued the ribbon around that ring, and love the way it looks.  Then I measured from the hook (centered above the crib) to see how far I wanted the mobile to hang.  I divided that measurement in half and then added 2 inches for a little give and the knots.  I tied each of those ribbons to the middle ring with a knot and then hung the mobile from the hook.  I love how some of the ribbon is starting to curl.

 Here is Baby Bun’s view.  Fun, right?  
I hope he or she will love it.  

 I think it is simple, yet bright and fun.  Below you’ll find a little sneak peek into the nursery.  Jackson is mystified by all the goings on back there.  As you can see we have rugs in place (that used to be in our bedroom) over the weird rent house carpet.  There is only so much you can do in a rent house, but I hope to do all that I can to make it lovely.  The fabric hanging over the crib is an eyelet crib skirt made for my bassinet (32 years ago)  by my sweet grandmother.  She died 6 years ago, so I love that I have a piece that she made in the nursery.  Hopefully we will get it in place soon.  One step at a time.  

What is your craft project of the moment? 
I’m linking to some great craft parties.  Check them out on my right sidebar and find some inspiration for your own projects, or join in.  

My Hometown Baby Shower

 Even though I’ve lived far away for the last 6 years, my sweet friends from home threw me a baby shower this past weekend.  Jed was on spring break, so we headed to Little Rock on Thursday for a little extra quality time with my family and friends.  We stayed with my parents as usual, but this time there were 7 dogs at the house as well as 7 people.  It was a bit crowded, to say the least.  I’ll post more pics of Dogapalooza ’11 later, but for now you’ll have to be entertained with Julie’s (one of the hostesses) pictures from the shower.  Crystal, another hostess, hand painted the letters shown above for the nursery.  I am in love with them.  I can’t wait to hang them (or more likely make Jed hang them) on the wall above the crib.  So cute!

 Here I am, with my giant belly.  This child is growing like crazy and moving like a fly girl on “In Living Color.”  Does anyone remember that show?  I wanted to be a fly girl so bad.

 Check out that spread, y’all.  My friends worked so hard and made lots of delicious food for us.  We had an incredible brunch of creme brulee french toast, fresh fruit, 2 different quiches, croissants, and brownies, and 2 different cakes.  The cakes were beautifully decorated to match the paintings that Crystal created for the nursery.  I’ll have pics of both later.  Julie created the diaper cake in the middle, which is now decorating the nursery.

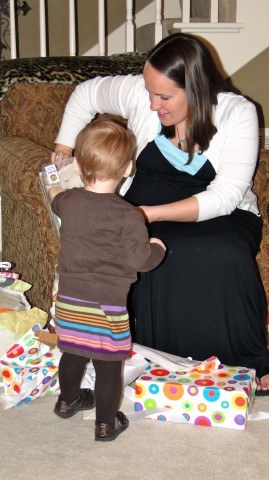
 My niece, Caroline, was a big help unwrapping the gifts.  

 Trisha, my mom’s best friend, and her daughter Sarah have known me since Sarah and I were 4 years old.  Now she is the mama of sweet Maya, and I’m pregnant with my first.  I love that we are still great friends after  27 years.

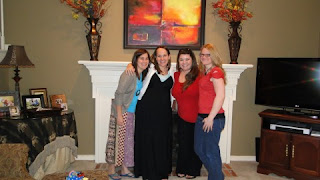
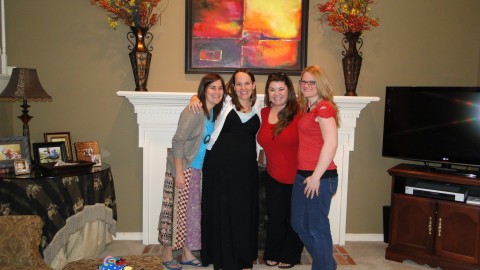
 Marci, Julie, and Crystal put so much hard work into this shower, and I am so grateful for them.  They are dear friends that I’ve known forever.  Julie and I met very young playing in my neighborhood, then went to junior high and senior high school together.  We’ve been roommates in the past and had a great friendship across the miles for a long time.  Marci and I met in junior high youth group and became friends and partners in crime soon after that.  Crystal and I met in college and were finishing each other’s sentences after a week.  I love these girls and they and their families are some of my favorite people in the world.  They are all mamas already, and have given me so much great advice.  They really get me and it is so important to have people like that in my life.  I miss living near them and hope to again someday.

Do you live in your hometown, 
or are you making a new life far away?

Be sure to check out the Spring Fling Day 4 Giveaways:
A Headband with Sweet Interchangeable Crocheted Flowers from Momma’s Kinda Crafty
A Gorgeous Spring Bouquet of Hair Accessories from My Mommy Can

A Last Look at Christmas

Our family had a wonderful Christmas together in Little Rock, though we were missing my youngest brother Matt who was traveling in Bolivia. Here we all are, after I forced them to pose for a group picture. How cute is my niece, seriously? She is such a doll.

As I just got these pictures uploaded, finally, I decided it wasn’t too late to give you a peek at our Christmas decorations. Most of them made it to the attic shortly after Epiphany, but a few stragglers are hanging about waiting to be taken up. I haven’t taken the photo cards down yet, but they will get transferred to the fridge this week.
I hang all the flat photo cards on our reclaimed wood mirror, handmade by our dear friend Bruce. I use hemp cord and mini clothespins so that we can see the smiling faces of our friends and family. The cards that can stand on their own go on the mantle, but I forgot to grab a picture of that. I’m turning them into gift tags for next year right now.
I found this big nativity scene at an estate sale here in Dallas for $10. The seller told me that her mom made it by hand many years ago and used to display it in their front window every year. I love that we could give it a good home.
This teeny tiny nativity scene is from a great store in Little Rock called 10,000 Villages that is all about fair trade and supporting workers in their native villages. I love seeing the holy family sleeping soundly in the hands of God and thinking of our little family doing the same thing.
My newest obsession is this awesome felt mistletoe that I found at Bishop Street Market down in the Bishop Arts District. Love it. I hung it from one of our rafters with hemp cord.
I hope that you and yours had a very merry Christmas. I also hope that your Christmas decorations are put up and not hanging about burdening your to-do list.
When do you put up your decorations? Christmas Day, the day after, Epiphany, sometime in March…

Our Handmade Felt Christmas Stockings

I am loving the fireplace at our new rent house. It makes us feel so cozy and at home, and it has been trying to decorate it for Christmas. We had some fancy velvet stockings that didn’t really go with our style or decor so I decided to make some felt ones that were much more us. As many of you know, I don’t own a sewing machine (though it is one my Christmas list) and don’t really know how to sew. I definitely prefer glue to a needle and thread, so I used it heavily in this project, with a little needle and embroidery floss thrown in for good measure. This project started at my friend Betsy’s Christmas craft night a few weeks ago. She had a bunch of inspirational ideas cut out of magazines for us to check out. I loved an idea from Land of Nod that I’ve attached at the bottom of this post, and it inspired me to make these stockings with a few touches of my own.
Here are our stockings. I think they are super cute. I cut them out of thick felt, on the fold so that the bottom would be reinforced.


I embroidered our names on white felt and then stitched them onto the top of the stockings.
I cut out the circles of many different colors of felt using pinking shears for a unique look. I made them three different sizes for variety. The color schemes are different for each stocking, but with a few repetitive colors. I glued the dots to the stockings using 3-in-1 Advanced Craft Glue. Then I glued thick ric rac over the dots.
After the glue dried, I hand stitched around each stocking with the embroidery floss that matched the name stitching. Hopefully they will hold up when filled with goodness.
The last step was attaching polka dot grosgrain ribbon with both glue and a few stitches to the top right corner of each stocking to hang them by the chimney with care.
Here are the finished products above, along with Jackson’s stocking that I featured earlier this week. I need another stocking holder but I don’t mind sharing with the pup.

Here is the inspiration stocking from Land of Nod. They have such fun stuff, but it is mostly out of the budget. I saved about $50 dollars by making the stockings myself, though it did take a LOT of time. At one point I almost decided to just finish one this year, but decided to go for it. Next year I’ll need to make one for our little Bun that is baking in my oven.
What is inspiring you this Christmas season?
I’m linking up to some great parties. Check them out on my sidebar and join the fun.

Every Dog Needs a Cute Stocking

I bought this stocking for Jackson at an after Christmas sale last year. He did have a stocking for the first 9 years of his life, but I didn’t like it at all. This one came with a gold glitter paint pen to write his name on the felt. I’ve used said pen before while decorating stockings for my parents’ pets, and it is really difficult to use on the felt. I decided to hand stitch his name onto the stocking for a personal touch, and so it would go well with the stockings I’m making for Jed and me. This turned out to be far more difficult than I thought. I didn’t have felt to match the white on the stocking, so I had to stitch through the stocking itself. This was not super fun. The stocking is really thick and didn’t want to cooperate. It took so long that I had to rewrite his name in disappearing ink over 10 times. I persevered and I think the finished product was worth the effort.
Now I just have to finish our stockings so I can hang them on the mantle. Hopefully I’ll have them to show you soon.
Do your pets have stockings hung by the chimney with care? If so, does Santa bring them treats to fill their stockings?

I’m sharing my little project at some great parties. Check them out on my sidebar and join the fun.

A January Wedding…

I love weddings, especially when they involve people I care about. One of my oldest and dearest friends is getting married in January, and I am so excited for her and her fiance. We have been friends for about 17 years, and she is one of my favorite people in the world. I’m thrilled to be one of the bridesmaids. She has is one of the most creative and original people I know, so I couldn’t wait to hear about her vision for the big day.

She sent me these pictures to capture her vision of a “Winter Woodland Wedding”. I am obsessed with it. It is so them and just perfect. So, in honor of Marci and Scott, here is a glimpse of their winter woodland wedding fantasy for your enjoyment. I’ve added in the lyrics to The Avett Brothers’ song, “January Wedding” to get us all in a wedding mood. Go listen to it!

January Wedding by The Avett Brothers

She keeps it simple
And I am thankful for her kind of lovin’
‘Cause it’s simple

No longer do we wonder if we’re together
We’re way past that

And I’ve already asked her
So in January we’re gettin’ married

She’s talkin’ to me with her voice
Down so low I barely hear her
But I know what she’s sayin’
I understand because my heart and hers are the same
And in January we’re gettin’ married

And I was sick with heartache
And she was sick like Audrey Hepburn when I met her

But we would both surrender

True love is not the kind of thing you should turn down
Don’t ever turn it down

I hope that I don’t sound to insane when I say
There is darkness all around us
I don’t feel weak but I do need sometimes for her to protect me
And reconnect me to the beauty that I’m missin’
And in January we’re gettin’ married

No longer does it matter what circumstances we were born in
She knows which birds are singin’
And the names of the trees where they’re performin’ in the mornin

And in January we’re gettin’ married
Come January let’s get married…

I’m sorry but I don’t know the source of all the photos, because they were sent to me.

Our wedding theme was a mountain fair and barn dance, with brown and robin’s egg blue as the colors. We had snow cones, a popcorn machine, a photo booth, and a Marble Slab buffet. Our ceremony was in a field and our reception in a barn.
What was your wedding vision or theme?
Or, what is your dream theme?

Hoping for Fall – A Frugal Wreath

Dear Fall Weather,
The good people of the South are pining for your arrival. We are sweating in our jeans in hopes of hurrying you along. All we are asking for is a little cold front, just a taste of things to come. You are my favorite season, after all. This 95 degree with 85% humidity madness has to end.
Hopefully,
Becca


In honor of the fall weather that I just know is right around the corner, I decided it was time for a little frugal crafting. Hobby Lobby had wreaths and fake flowers on 50% off, so I got a grapevine wreath and a bouquet of sunflowers for under $5. Then I found a fall leaf garland at the Dollar Store. The grand total for the wreath was $6, plus the glue and scissors I already own. I’ve seen a few fall wreaths around that I’ve loved, but they cost $25-$45. Not in the budget…

I wrapped the garland around the wreath, securing it in the back in between the wires of the wreath, securing it with a little glue. I removed the flowers from their stems and covered the backs of them in glue. I wedged 3 of them in a row down into the wreath, holding them in place with pressure until the glue set.

Now I have a little simple fall festiveness to brighten up my front door.


Now if the weather will just cooperate, I will be spending a lot of time here:

Do you like the table Jed made out of our ice storm casualty? It holds a mason jar candle and will soon accommodate my drink of choice as I rock away. The mason jar candles got kicked off the front ledge to make room for the jar in the forefront, a solar powered mason-esque jar. Jed created 4 of them for our front porch. I’ll try to get him to do a tutorial. They are way cool.
Fall is my favorite season. What is yours?

Frugal Friday – Saving Vacation Memories

As you have read, we were blessed to go on a fabulous beach vacation to Mexico this summer. It was incredible, and I wanted to find a way to include the memories of this trip in our home decor. I found a 40% off coupon for Hobby Lobby when they already had all frames and shadowboxes marked 50% off. Awesome! I saved the free maps and brochures that we collected on our trip to use as a background collage. Using Mod Podge, I attached them to a sheet of cardstock. I added the shells we found while snorkeling, and ended up with a super cheap and easy vacation memory collage. I’ve tried scrapbooking in the past, and always found myself spending way too much money and never finishing the thing. This was much cheaper and I actually completed it in a timely fashion.

How do you preserve your vacation memories?

I’m linking to some great parties. Check out the full list here.

Hodge Podge Friday

> Photobucket