Category: handmade

A Big Brother T-Shirt to Announce Our Pregnancy

When we found out we were expecting our 2nd wee one, I tried to come up with a sweet way of announcing the pregnancy to our friends here in Dallas, our family far away, and my bloggy folks.  I decided to hand embroider the announcement on to a t-shirt for The Bear to wear.  My hand embroidery skills are… not strong.  But hey, what’s life without a little imperfection?  

 I shot a few pics of The Bear in his t-shirt after I finished it, and sent them out to friends and family that live far away, with the caption, “The Bear has an announcement.”

 It took some of our friends and family a bit to figure out they had to read the shirt to get the announcement.

 Later we put the shirt back on The Bear to go see some of our friends at our regular Taco Thursday dinner. Such great reactions.

 The Bear also wore his shirt to my Young Life “retirement” party to share the good news with all our YL friends.

 Finally, I used the the pics to announce the pregnancy here on the blog.

 To make the shirt, I used a plain navy blue shirt that was already a part of The Bear’s wardrobe.  I have a collection of vintage felt and embroidery floss from and estate sale purchase years ago.  I used orange felt and navy blue floss and an embroidery needle that was waaaaay too big to stitch the design.  I fastened the felt into an embroidery hoop and stitched away after drawing the words with an disappearing ink pen.  I used the hoop as a guide to cut out the circle, and then stitched the circle onto the shirt.  Done.

How did you announce your pregnancy? 

I’m sharing this design over at Prudent Baby’s Embroidery Contest and at some other fun craft parties.

Baby Bliss – The Operation Cloth Diaper Review & Giveaway

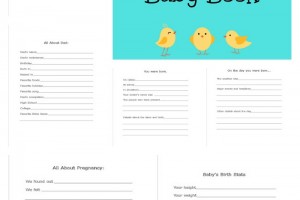
Today I’m bringing you a review and giveaway from The Operation Etsy Shop, run by cloth diapering WAHM Sara.  She was kind enough to send me one of her Bunzuke AI2 diapers and Convertabunz insert/prefolds to review.  We are obviously brand new to the world of cloth diapers, and are trying to figure out what kind of diaper fits our needs best.  We have several gdiapers and big brand pocket diapers and AI2s, but this was my first WAHM diaper.  I’m hooked.  The quality and customer service are fabulous, and her selection of fabrics are fun and unique.  She even has a dark denim diaper on her Etsy site right now.  Wouldn’t you rather pay $12 for a denim diaper your baby can use from birth to potty training instead of buying those lame disposable “jean” diapers that just go in the trash?  I would.

Please look at the belly on this kid.  Isn’t he the cutest?
The Operation has a You Tube channel with tons of informational videos on cloth diapering in general and Sara’s diapers in particular.  Here is one that explains the Convertabunz insert/prefolds.  

 From Sara:

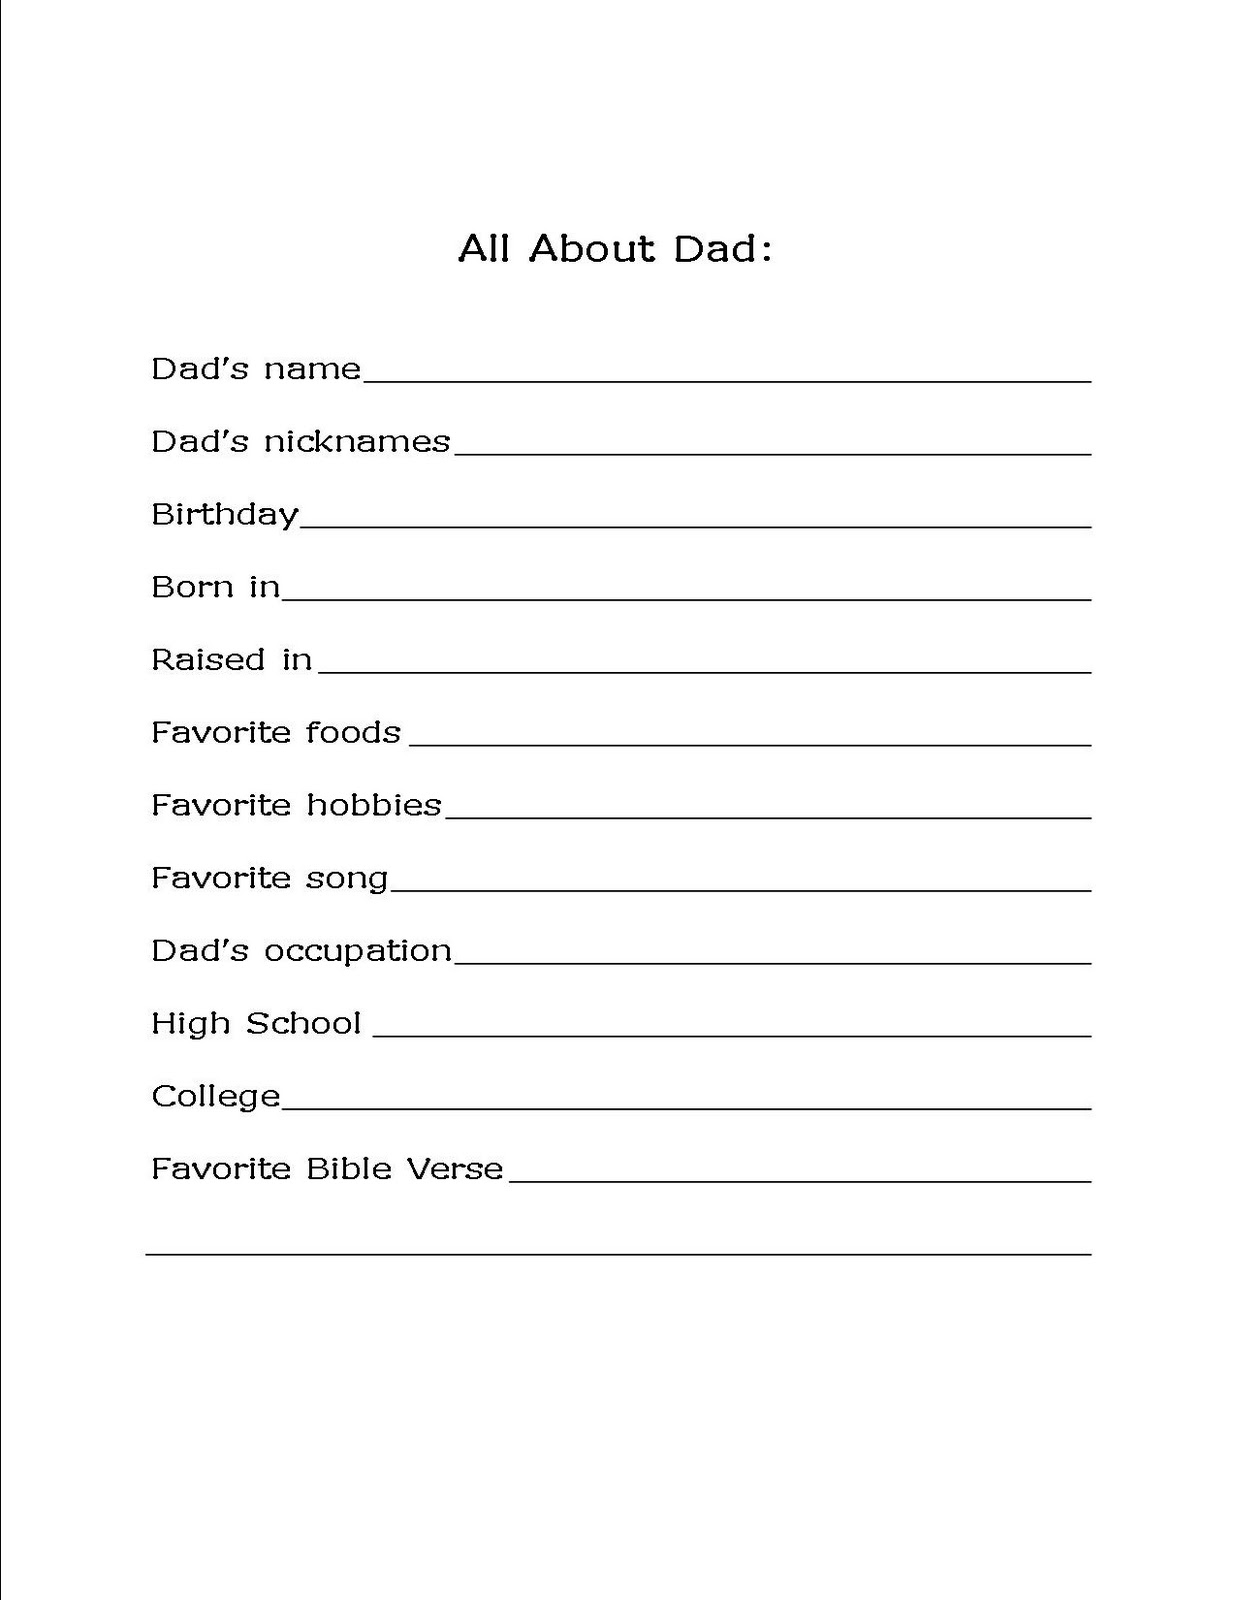
I started making diapers for my daughter when she was 3 months old and became hooked! I still make each diaper as if I was making it just for her. The materials are prewashed and sewn using a size 9 ballpoint needle and polyester thread. Each snap is hand applied using a Kam snap press and tested for proper function. Every seam is checked and every loose thread snipped. I don’t sell a diaper that I wouldn’t buy myself! Bunzuke cloth diapers are designed to be used as a pocket diaper or all in two diaper. Here are some Bunzuke stats:

Style: Pocket (see photo) / AI2 ( 2 back snap sockets, 3” apart)

Size: One size fits most (8lbs-35lbs), snap down rise

Materials: Inner – polyester microchamois
Middle – PUL (waterproof polyurethane laminate), 
Outer – cotton woven

Measurements: 10 ½” long rise on smallest snap setting 
13” long relaxed
18” long fully stretched
~5 ½” at narrowest width

Prices: Bunzuke diaper shell (as listed) $12.00 and up
Bunzuke diaper with Convertabunz TM 1.0 Snapping Prefold and Insert $18.00 and up
(choose the $6.00 prefold/insert listing when purchasing a diaper)

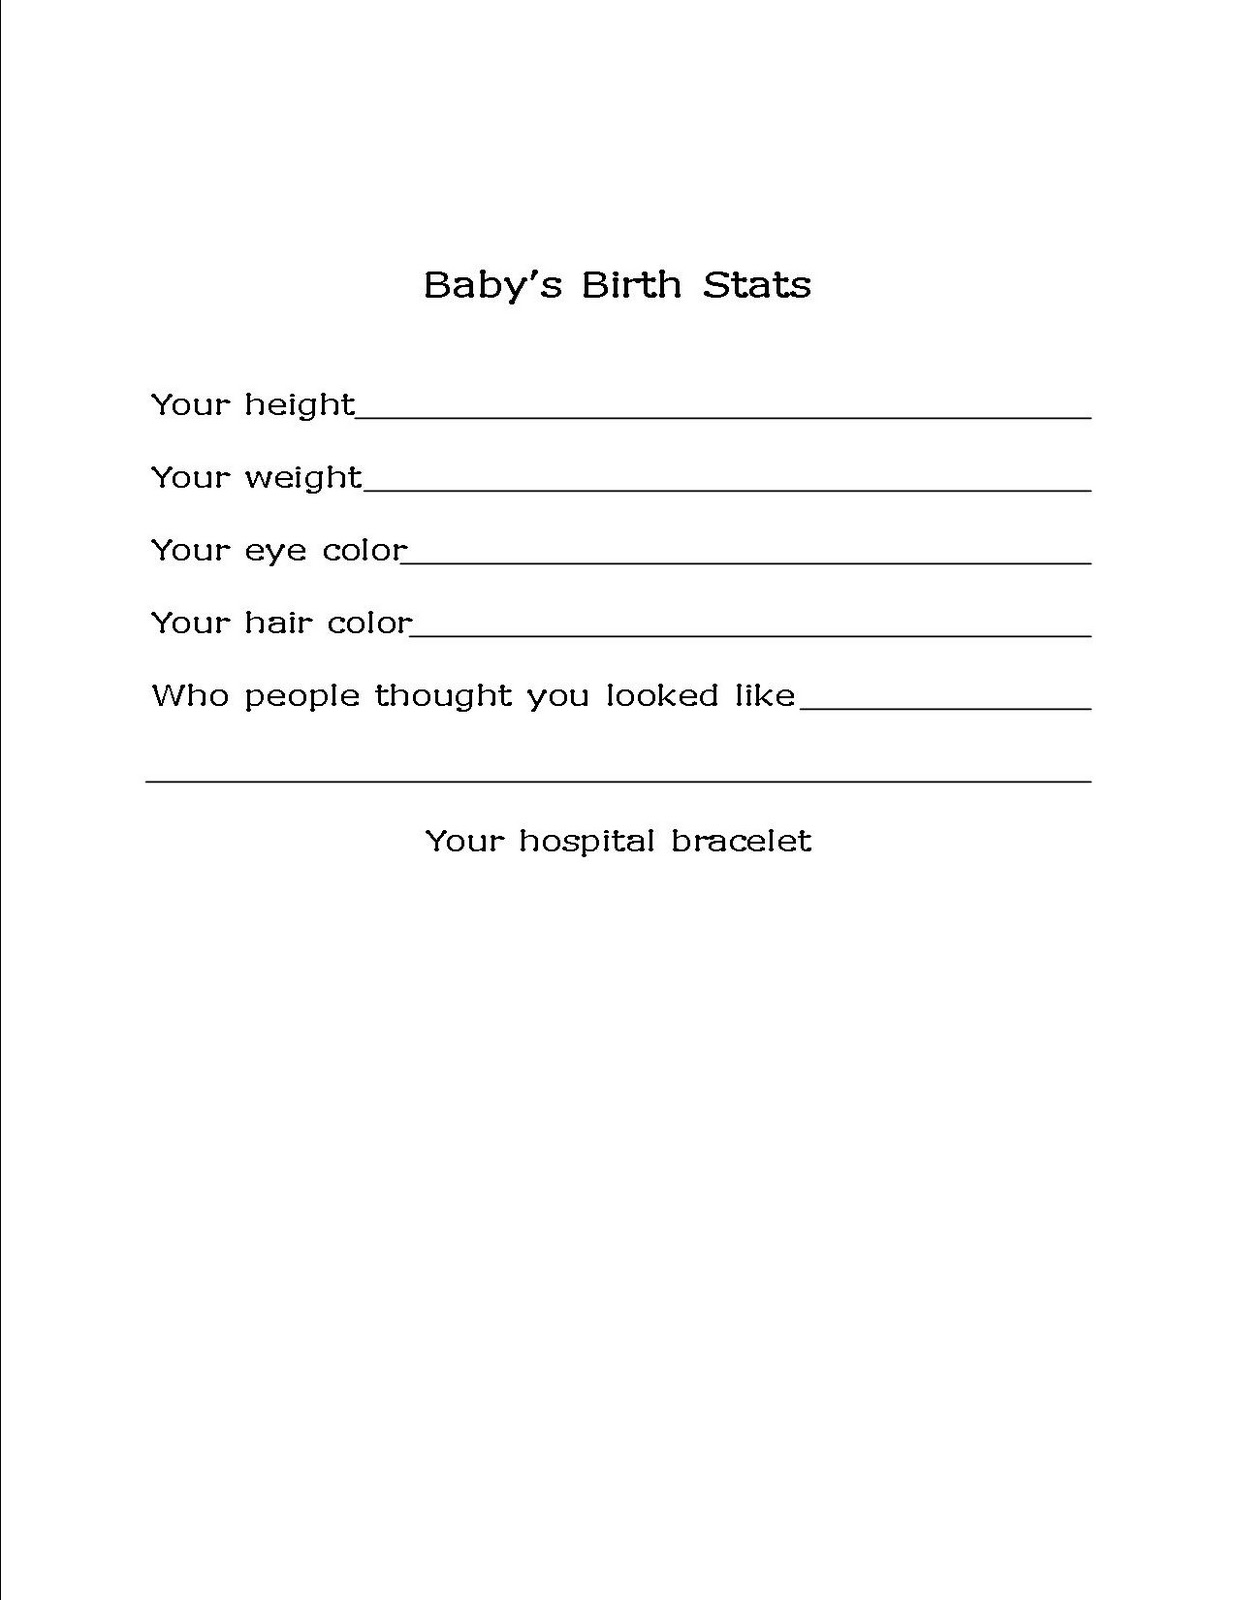
 Right now Fisher weighs 10 pounds 4 ounces, and the AI2 is fitting on the smallest setting.  It fits snuggly, but doesn’t squeeze his chub.  I use the Convertabunz as an insert, and it was so absorbent that no moisture touched the diaper itself and it could be used again.  Jed was nervous the first time we used it, but now trusts in the power of the cloth diaper.

We have mainly used disposables and gdiapers up to this point, so I will use those for comparison.  We are gradually making the switch to all cloth and learning as we go. The diaper fits better than the gdiaper and is more absorbent.  It was easy to fit and the liner snaps in quickly.   
Positives: No leaks, super cute design, supports a WAHM, high quality materials, comfy for baby, easy to use after you get used to them, dries quickly, fits well at 10 pounds, great customer service, great price
Negatives: can’t get it at the grocery store, bulky fluffy butt
The positives far out weigh the negatives, which are common to all cloth diapers.  

 The Operation has a ton of designs listed, most for $12, or $18 with an insert included.  That is far cheaper than a lot of major cloth diaper brands.  I’m excited to buy more diapers from The Operation at $18 that will last through the next several years and not contribute to landfill waste, instead of a box of ‘sposies for the same price that will last 4 days.

 This boy wants to roll over so badly!
Sara is generously giving away a 50% off coupon to anything in her shop.  That is up to a $15 value. Want to go shopping for some very affordable cloth diapers?  It is easy to win.  All you have to do is leave a comment for each entry.  
Mandatory Entry: Like The Operation Facebook Page.  (1 entry)
Bonus Entries: 
Leave a comment on her FB page saying that I sent you.  (1)
Leave a comment or like your favorite diaper on FB and/or Etsy.  (1 each)
Share this giveaway on FB and Twitter.  (1 each)
Add The Operation Etsy Shop to your favorites. (1)
Follow me through GFC, Twitter, FB, email, or RSS. (1)
Don’t forget to add your bonus entries if you posted the event button early.
This giveaway will end Sunday, July 17th at 11:59 pm.  The winner will be chosen by a random number generator.  I received a cloth diaper to review but was not in any way compensated for this review.  All opinions are my own.  

The Nursery Part 4: The End

Remember this?  This quilt (made by my great-grandmother) was the inspiration for my bright vintage nursery.  You can see the first three installments of the nursery reveal by clicking Part 1, Part 2, or Part 3.  Why did I divide it up so much?  Because 28 pictures was far too much for one blog post.    

I created this ribbon mobile to go over the crib to keep the wee one entertained.  You can read about the creation of it here.  We got the crib on clearance at Target, and the crib sheets, Sleep Sheep, and sweet turtle blanket were shower gifts.  The curtains are also from Target, and I got the Boppy (complete with the organic cover) on clearance at Amazon.  Don’t worry, it is only staying in there temporarily.  The rugs lived in our bedroom for a while, and came from the Second Saturday Sale in Little Rock.  I’ve seen them at boutiques here in town for over $200, but I got them for $20 each.  The crib skirt is my favorite.  It was made by my grandmother for my crib 32 years ago, and is still in great shape.  It is too long, but I just folded it up under the mattress to make it work.  I should have taken a close up picture so you could see the lovely eyelet lace.      

This “bookcase” was a gold plate holder given to me by Michelle, my sister-in-law.  I spray painted it yellow to match the room, and am using it to hold some of the books we’ve received as gifts.  Below you can see the ring full of family tradition ideas that my Dallas shower guests wrote down for me.

And finally, here is Jed’s favorite part of the nursery, the Twilight Turtle.  When you turn it on it projects stars onto the ceiling using real constellations.  He likes to show it off when we bring people back to the nursery.

What is your favorite decorating item?  
What do you like to show off to visitors? 
I’m sharing this post at some great parties.
Check them out on my right sidebar and join in.   

The Nursery Part 3: More Vintage and Hand Painted Touches

Today I’m showing you another little corner of the nursery.  You can see part 1 of the nursery reveal here, and part 2 here.  I love this little corner.  We used a regular dresser that we already owned, and created a diaper station on top of it.  The changing pad is waaaay bigger than I though it would be, but I guess it is kind of important.  The little canvas basket was a shower gift, and I’m using it to hold diapers, cream, and wipes.

These paintings are my favorite part of the whole nursery.  My friend Crystal, who painted the letters and buckets, also did all three of these for me.  Bunnies and ducks have been inexplicably irresistible to me throughout the whole pregnancy.  These paintings fulfill that craving, but without looking too babyish.  I love them so much.

One of my other favorite touches is this retro fan that I found at an estate sale.  It is totally vintage, fits the color scheme, and is functional.  Isn’t it the cutest?!  
Come back tomorrow for more scenes from the nursery.  
I’m sharing this post at some fun parties.  
Check them out on my right sidebar and join in.  

The Nursery Part 2: Hand Painted Letters

Can you imagine my surprise and delight when my sweet and creative friend Crystal presented me with these hand painted letters at my Little Rock baby shower?  She matched the paint colors to the bright, vintage theme of the nursery, and attached matching ribbon for hanging.  She even gave me all the leftover ribbon.  Amazing.  Here’s one of the inspiration quilts to compare the color scheme.  

I love how each letter is unique.  I hung them above the closet to divert attention from the mirrored door and weird gold trim.  Oh, rent house weirdness…

You can see part 1 of the nursery here.  
Stay tuned for more tomorrow.  
I’m sharing these fun letters at some great parties you can find on my right sidebar.  Click away and join the fun.  

The Nursery Part 1: Bright and Vintage Inspired

I searched high and low and all over the internet for inspiration for Baby Bun’s nursery.  I picked out bedding at Babies R Us, then ditched it in favor of a set from Target.  Then I remembered my great grandmother’s quilts and decided to go in a completely different direction.

I used the colors in these quilts for inspiration, and decided to go with a brightly colored vintage theme.  One quilt hangs over a spare chair that will be replaced when we move the glider from the living room to the nursery.  The other covers the full size guest bed that lives in half the room.

We used a lot of handmade furniture that my husband crafted, including the headboard and two shelves.  One of the shelves has several cubbies that are filled with baby things stored in cute buckets painted by my friend Crystal.  

The little birdie is a tap nightlight, which will be super handy above the changing table.  In another cubby lives Paulo the Piggy Bank that I painted with some of my WyldLife girls, and one of the corsages from my baby shower.

More vintage inspired touches include a trio of mod podged doily paintings that you can read about here, and mason jars filled with brightly colored pinwheels.

Glow in the dark sheep live atop the cubby shelf, while toys and a diaper cake begin to fill the play corner.

OMGiant Belly…

Jackson enjoys the fluffy rugs that used to reside in our bedroom.  They help to mask the ugly rent house carpet.  We can’t cover up the rent house mirror doors, so I’ll use them to give you a preview of the rest of the room.  Come back this week to see the rest.

Where do you find decorating inspiration?  
I’m sharing this post at some great parties.  
Check them out on my right sidebar and join the fun.  

A Very Festive Baby Shower

I am so blessed.  We have lived in Dallas for less than three years, and are already surrounded by an amazing community of friends.  Six of our friends recently threw one seriously festive baby shower for Baby Bun and me.  They are a creative bunch, and the shower had so many unique touches.  They handmade name tag corsages from paper and felt for everyone to wear.

The party took place at the home of our friends the Ballards.  They had only moved in one month before, and then were robbed right after buying the house.  I was pretty impressed by how moved in they were.  I have a tendency to live out of boxes for way too long.  The girls used bright, fun colors to decorate, and served a buffet of breakfast burritos.  Yum.

The tables were decorated with fresh greenery, nests of burlap and moss, and blown out brown eggs with “baby” written on them.  It was so different from the typical baby shower pink or blue, and I LOVED it.

See those brightly colored beads in the vases?  They keep plants moist without the mess of water, apparently.  Very cool, and festive.

For dessert the girls served homemade pralines and mini cupcakes in lemon and chocolate.  I tried to use restraint and failed miserably.

Each guest was asked to share a favorite family tradition to give us ideas of new traditions to start with our little family.  The girls put them all together on a metal ring and sent me home with a massive stack of ideas.

There were three round tables set up outside, and we had a beautiful Texas morning.  Each table was decorated with a straw wreath, moss, the burlap and eggs (like inside), and vases filled with individual flowers.

Inside there was a mimosa bar set up, with water and plain orange juice available as well.

I am so thankful that so many friends and family came and showered us with gifts.  We are so truly blessed.

My sweet mama came into town for the shower, and Betsy (one of the hostesses) made her a special corsage with her grandma name (Dede).  My sister in law came up with Dede as an easy name for my niece to call her, as her non-grandma names are Deborah and Debbie.

Here are four of the six hostesses: Morgan, Whitney, Allison, and Betsy (Asia and Ellen are not shown).  I’m the rotund one in the middle, of course.  I am so thankful to these girls for throwing an amazing shower for me and going to the trouble to get seriously creative.  I felt really special.  I showed you a bit of my Arkansas shower earlier, and I promise to show more of that one soon.  Some amazing friends from work threw me a lunch shower as well, but I’ve got to get the photos from one of them.  Once again, we feel so incredibly blessed.  

So, in keeping with the shower idea… 
What is your favorite family tradition?  
I’m sharing this festive baby shower post over at some great parties.  Check them out on my right sidebar and join the fun.  

A Ribbon Mobile for Baby’s Nursery

We are hard at work on Baby Bun’s nursery, and my favorite part is the decorating.  I saw a ribbon mobile I love at Pottery Barn, but it was almost $70.  I decided I could make one pretty easily for a lot less.  I piled up the coupons and went to Hobby Lobby.  Ribbon was half off.  Score!  I bought ten different colors of ribbon and a wire wreath frame.  I already had paint for the frame and craft glue.  The wreath was that floral dark green, so I painted it light aqua.  The aqua repeats itself throughout the nursery, as do most of the other colors.  As you can see we did not stick solely to the traditional gender neutral colors of green and yellow.  I can’t wait to show you all of the nursery when we get done.  

 At first I cut the ribbon into strips, but they were way too long.  I wanted to make sure the baby couldn’t grab it even when he/she is able to stand in the crib.  I cut each piece in half and it was perfect.  Check out the massive pile of ribbon.

I glued strips around the inside ring first. I folded each strip over and putt a dot of craft glue on it, then held it in place for a few seconds.  This was effective but a bit messy.  I think you could double the length and knot it in half for a glueless mobile.  After the inside ring, I decided to skip the two middle rings and go straight to the outside ring.  I glued the ribbon around that ring, and love the way it looks.  Then I measured from the hook (centered above the crib) to see how far I wanted the mobile to hang.  I divided that measurement in half and then added 2 inches for a little give and the knots.  I tied each of those ribbons to the middle ring with a knot and then hung the mobile from the hook.  I love how some of the ribbon is starting to curl.

 Here is Baby Bun’s view.  Fun, right?  
I hope he or she will love it.  

 I think it is simple, yet bright and fun.  Below you’ll find a little sneak peek into the nursery.  Jackson is mystified by all the goings on back there.  As you can see we have rugs in place (that used to be in our bedroom) over the weird rent house carpet.  There is only so much you can do in a rent house, but I hope to do all that I can to make it lovely.  The fabric hanging over the crib is an eyelet crib skirt made for my bassinet (32 years ago)  by my sweet grandmother.  She died 6 years ago, so I love that I have a piece that she made in the nursery.  Hopefully we will get it in place soon.  One step at a time.  

What is your craft project of the moment? 
I’m linking to some great craft parties.  Check them out on my right sidebar and find some inspiration for your own projects, or join in.  

**UPDATE** Our Homemade Baby Book – With Free Printables

freeprintablegenderneutralbabybook

**Update** I’ve added a free printables tab to the top menu of the blog (under crafts/diy).  Click there to find all the baby book pages to print for free in either PDF or Publisher (so you can edit) files!  Enjoy. They are free for personal use only.  I just ask that you share the love on Pinterest and follow my blog through Bloglovin’ or social media.

My quest for the perfect baby book began back in the fall when we first discovered that I was pregnant.  I found so many cute ones for boys and for girls, but NOTHING cute for those of us who don’t find out the gender until the birth.  I did find one gender neutral book at a boutique here in town, but it was $70.  Are you kidding me?  For a baby book?  Come on now, people.

So, I decided the search was over and I would create my own.  I found a couple of great coupons for Hobby Lobby and bought an 8 1/2×11 chocolate brown scrapbook and a big package of bright primary colored cardstock.  You can also find a great deal on 8 1/2 x 11 cardstock and scrapbook albums on Amazon. I decided to go with the primary and bright colors instead of traditional pastels, because they seemed more fun.
I found a great gender neutral and baby book appropriate font called Drummon here.  It reminds me of printed handwriting with cute dots on each letter.  I love the simplicity of it.
I printed out each page on a different bright color of scrapbook quality paper.  The pages are red, blue, orange, yellow, and green.  Hopefully using the high quality paper will prevent fading or bleeding over time.
I’ve already filled out all of the pages that I can, and will continue as the baby is born and begins to grow.  Now I’m adding some fun stickers and more personal touches.  So far, this project has cost me about $17.  I probably could have found a lame baby book for less than that, but I love how personal this one is, and how I can continue to make it more so.
There is a page for my side of the family, too.
Please feel free to download them for any time from my “free printables” page.  They are for personal use only.  I just ask that you share the love by pinning this page and following my blog through Bloglovin or social media.  Thanks! I’d love some feed back about what pages I should add.  The problem with not having an actual baby book to work from is that I don’t know what I’m missing.
What pages should I add?

My Favorite Crafts of 2010

I started blogging in January and got semi-serious about it in March, with a few lapses along the way. I have so enjoyed getting to read so many great blogs and sharing my life and little projects with y’all. Along with everyone and their grandma I’ve decided to do a few best of 2010 posts. I’ll start with my favorite craft projects of the year. Check ’em out.

The Picket Fence Project Part 1
and Part 2


Anthropologie Inspired Golden Rose Sandals


Vintage Fabric Headband Inspired by Anthropologie


Decorating with Paper Flowers

Cake Plate Jewelry Holder


The Doily Project


Vintage Necklace Remake

Shell Shadowboxes

One of my goals for the new year is to take on more craft projects because they bring me so much joy. I have a huge crafty to do list inspired by our coming baby, other blogs, and our new rent house. What craft project is at the top of your to do list?