Category: decorating

Frugal Christmas: A Toddler Friendly Mini Tree

 I LOVE decorating for Christmas.  I long for a touch of Christmas cheer in every room of the house.  The Bear’s room is a special challenge because he is now 18 months old and into EVERYTHING.  He can reach to grab things off his shelves and has a special gift for taking things apart.  I decided the answer was a toddler friendly mini tree, but my budget was only $5.

I found this mini tree in the dollar section at Target years ago, along with the hat topper and mini tree skirt.  They cost $2 total.  Target has mini tinsel trees right now, and all of their Christmas stuff will go on sale soon if it isn’t already. 


 I looked at mini tree ornaments at Michael’s, Hobby Lobby, and Target, but most of what I found was either breakable or a choking hazard.  Yikes.  I remembered seeing a fun idea using plastic animals on Young House Love last year, but I couldn’t find the post and got frustrated.  After strolling the aisles of Hobby Lobby I came across a big container of large red jingle bells on sale for $3.50.  Jingle bells are festive, give a pop of color on my little silver tree, aren’t breakable, and are too big to be a choking hazard.  Hooray!  I bought white grosgrain ribbon on sale for $1 and pieces through each bell.

 The Bear had a fabulous time playing with the bells and was able to help me decorate his tree.  Hello, fine motor skill development!  I love the simplicity and festiveness of his tree, and the fact that he can’t break it or hurt himself on it.  Let’s call it a Christmas Mini Tree Miracle.

Here’s the toddler eye view.  Shiny!
Do you decorate your kid’s rooms for Christmas? How do you make it kid proof?

Duck Creek Ranch: The Before Pictures, A Celebration of 80s Home Decorating

 Here are some of our before pictures, complete with the previous owner’s furnishings.  We took these during a walk through before she moved out.  I’ll have more later.  We plan to ditch the grape wallpaper and paint the cabinets white.  I’d love new counter tops, but that is a long range project.

 We will paint all the trim and wainscoting white, as well as the cool built in to the left.  I’m looking for inspiration to replace that light fixture on pinterest.

 Here’s the half bath off the kitchen, the scene of plumbing nightmare #1.  Eventually we’ll paint the wood and the walls, and replace the light fixture.  I’m thinking I’ll paint the mirror’s frame a fun color.

 The kitchen opens up to the living room.  Let’s play count the grapes on the wall.

 Here’s the living room complete with nightmare popcorn ceiling and so much wood paneling.  We ripped out the carpet and took down the popcorn.  We’ve painted the paneling and are almost done with the trim.  I can’t wait to show you the after pics!

 You still can’t see the popcorn very well, but trust me when I say it was awful.  Popcorn ceilings have never really urked me, probably because I grew up in the 80s.  These were a whole other level of popcorn, big nasty kernels everywhere.  Gross.

 This is the front door and entryway.  We plan to rip off the wallpaper and make this a fun focal wall with family pics.

 The dining room was otherwise known as the previous owner’s cat’s litter box.  Thanks to advice from some of my cat loving friends we are battling the cat pee destruction day by day.  We’ve ripped out the carpet and are hitting the pee daily with Nature’s Miracle Enzyme cleaner.  Jed said it is the nastiest job he’s ever had to do.  He ripped out the base boards and is fighting with the concrete below.  We plan to put in wood laminate flooring and take down the wallpaper as soon as we get the cat pee under control.  We haven’t decided on a paint color yet, but I’m leaning toward an aquamarine.

 Our master bedroom feels so big, and we have fallen in love with the parquet flooring though we hated it at first.  We’ve already painted in here and I’ll have after pics up soon.

 The master bath is the scene of plumbing nightmares #2-5.  Eventually we want to gut the whole dang thing. Don’t you love the magnolia trim and gold flaked wallpaper?  You don’t?  I HATE it.  Please note the teeny tiny bathtub.  Who fits in that?  It was not made for a full grown human.

This will be the Bear’s bedroom eventually, and the almost identical bedroom will be Mini Bear’s.  We’ve set up Bear’s stuff in the other room so that we can paint this one without all his furniture in the way.  
Take away all the previous owner’s furniture, add in new carpet, tons of boxes, and the odor of cat pee, and you’ve got a great picture of our Duck Creek Ranch.  We know we will make it into a beautiful home for our family eventually, but the getting there is going to take a while.
How long did it take you to feel at home in your house? 

Summer Mantle and a Cheap Giant Photo

I love to change up my fireplace mantle, but I don’t like to spend money.  I have to look at it constantly, so I want it to be something I enjoy.  Often I repurpose items from around the house.  I used one of my Meme’s vintage blue mason jars to hold up 3 fun pinwheels I found on clearance at Hobby Lobby last year.  I also used 3 red candles from around the house for the other side.  The giant photo in the middle is my masterpiece.  I saw a great post on Pinterest about blowing up photos for under $5 and decided to put it to the test.  I edited my photo by adding text, then took the file to Kinko’s on a thumb drive.  I asked them to blow it up to a 2×3 engineer’s print.  It cost $3.  Total.  The quality is not the same as when you pay for a more expensive print, but I love the look of it and the fact that I can change it out at will.    

My husband cut out a piece of foam insulation to fit the print, and I painted the edges aqua to match other accents in my living room and disguise the ugly foam insulation.  I mounted the print using spray adhesive.  Easy.

Have you tried the giant print trick yet?
I made 2 others; one for Jed’s classroom and one for the 
ugly mirrored closet doors in The Bear’s room.  
So fun and so frugal.  Go for it!
I love linking my ideas at these blog parties.  Click the links to check them out and find crafty inspiration.  If you’ve never visited a blog party, you will be blown away by the creativity shared and imaginative ideas.  
Monday: CraftOManiacMad in CraftsIt’s So Very CheriSew ChattyThe Girl CreativeKeeping It SimpleC.R.A.F.T.Boogie Board Cottage, and Sumo’s Sweet Stuff   
Tuesday: Raising 4 PrincessesThe Kurtz CornerHope StudiosToday’s Creative BlogCoastal Charm, and New Nostalgia 
Wednesday: The Trendy TreehousePolka Dots on ParadeLil Luna, and The Thrifty Home
Thursday: Somewhat SimpleTales from BloggeritavilleThe Shabby Creek Cottage, and House of Hepworths
Friday: Sugar and SpiceKojo Designs, and The Shabby Nest
Weekends: Tatertots and Jello, Serenity Now, and Candace Creations 

Burlap and Pinwheels – A Summer Wreath

I’m still in love with my interchangeable burlap wreath.  It just makes switching out seasonal decorations so easy.  For summer I left the grass and flowers in from my spring wreath and added pinwheels from Dollar Tree that were 3/$1.  They happened to match the ribbon I used in the spring wreath.  Click here to see my spring/Easter version and here to see the Valentine’s Day version.  

 Getting the pinwheels to stick in the wreath was far more difficult than I thought it would be.  I thought the stakes would poke through and make the pinwheels stand up.  Nope.  They broke off instead.  I weaved each stake through the grass a little bit and then used straight pins to secure the stakes onto the back of the wreath.  Because the wreath is on our front door and gets opened and shut a lot, I’ve had to readjust the pinwheels several times.  I’m ok with that.  I love the whimsical look of this wreath and the fact that it cost only $1 to switch to a summer version.

Pinwheels, flip flops, Americana, beach flair… 
How do you decorate for summer?  
I love linking my ideas at these blog parties.  Click the links to check them out and find crafty inspiration.  If you’ve never visited a blog party, you will be blown away by the creativity shared and imaginative ideas.  
Monday: CraftOManiacMad in CraftsIt’s So Very CheriSew ChattyThe Girl CreativeKeeping It SimpleC.R.A.F.T.Boogie Board Cottage, and Sumo’s Sweet Stuff   
Tuesday: Raising 4 PrincessesThe Kurtz CornerHope StudiosToday’s Creative BlogCoastal Charm, and New Nostalgia 
Wednesday: The Trendy TreehousePolka Dots on ParadeLil Luna, and The Thrifty Home
Thursday: Somewhat SimpleTales from BloggeritavilleThe Shabby Creek Cottage, and House of Hepworths
Friday: Sugar and SpiceKojo Designs, and The Shabby Nest
Weekends: Tatertots and Jello, Serenity Now, and Candace Creations 

Decorating an Easter Mantle

Spring is here and Easter is one of my favorite holidays.  
Ok, I say that about all the holidays.
But seriously, Easter is my favorite.
I love that it represents the risen Jesus and the hope of new life.
To decorate our mantle, I took inspiration from Pinterest and used lots of items found around our house.  The cute sign I bought on sale last summer at my favorite shop in Little Rock, The Full Moon.  They have an assortment of fabulous things that is ever changing, and they have really great sales a couple of times each year.  I even registered there for my wedding.    

The bunnies were inspired by a few Pinterest finds like this one, but I couldn’t find a pattern that was the right size.  I sketched one out and used it to cut the design out from several different colors of cardstock.  Then I glued little puff ball tails onto my bunnies and glued the bunnies onto a brown ribbon measured to hang across the mantle.

Super cute little baby bunny.  

I brought in 2 giant flowers that we’ve had since our wedding.  They decorated the gift table at our rustic barn reception.  I filled 2 of my Meme’s old blue mason jars with plastic eggs, inspired by this Pinterest find.  I added artificial flowers leftover from last year, and a sweet flocked bunny I won from a blog giveaway at Goodbye House, Hello Home a few years ago.

I love the color the eggs and bunnies and flowers bring into the room.  It feels like spring.

Our wedding and engagement pictures have been on our mantle for a while now, and I’m feeling it is time for a change.  I’ve searched for ideas and landed on a few that I’m working on.

If you are looking for more Easter ideas, here is my Pinterest inspired Easter wreath.  
How do you celebrate Easter? 
Check out the fun craft parties I link to on my right sidebar.  

Let’s Make an Easter Wreath

Easter is my favorite holiday.
Spring is my favorite season.
I really love the joy of Jesus risen and all of the bloom of new life.
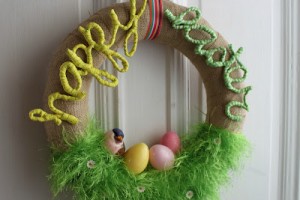
I searched Pinterest for spring and Easter decorating inspiration and found this and this and decided to combine them using my interchangeable burlap wreath that I made here.
Here’s how it came about:
I stripped the Valentine’s Day stuff off the burlap wreath and wrapped the bottom of it in haute fur yarn, pinning the ends of it into the wreath with straight pins. Then I cut individual daisies off the daisy chain ribbon and pinned them into the “grass” using coordinating straight pins.  I arranged a few plastic Easter eggs in the grass using the straight pins and moved them until I was happy with their placement.
I created the words using dollar store pipe cleaners and ribbon leftover from the nursery decorating.
You can find the pipecleaner letter directions found here.
I couldn’t decide where to put my lil birdie.  I moved him around and took him off and put him back on.  He sticks in with yet another straight pin, so it was super easy to move him.  What do you think- bird or no bird?
He ended up here.
 I’m super happy with the way it turned out.
 The letters were WAY more difficult than I thought they would be.
Pipecleaner molding is not my best skill, apparently.
I also had a bit of a fiasco with the ribbon.  I ran out on the happy and had to go back and make it super tight so it would cover the whole thing.  In between I went to Hobby Lobby to find another spool of ribbon.  They were out.  They had just received a huge shipment of literally every other type of ribbon except the one I needed.  A craftastrophe! Oh well.  It all worked out in the end.
 Does the Easter Bunny visit your house?

A Vintage Highchair Makeover with Tutorial

Fisher is now 7 months old, and was in desperate need of a high chair.  We looked all over to find one that we liked, but had no luck.  We wanted a vintage wooden one, but all that we found were ridiculously expensive.  Big plastic models were looming in our future when our friend Betsy spotted this metal gem at a vintage store for $20.  She grabbed it for us.  Jed was horrified.     

 The poor chair was all kinds of ugly, and Jed though there was no hope.  As eternal optimists, Betsy and I saw lots of potential.  I took the ugly duckling home and it sat in the garage for a while until we had time to get the project completed.

 The tray has already been sanded in the above pic.  It was originally the same color as the back below.  Ick.

 Ugly, oh yes she’s ugly.  On the other hand, she is very well made and easily folds to store flat against the wall.  The tray also removes completely so that it can be easily cleaned.  Awesome.  

 The tan seat and seat back had to go, immediately.  My mama and I went to visit City Craft, a great Dallas fabric store.  I wanted to find some oil cloth to recover the chair so that it would be durable and easily cleaned.  City Craft has a great selection, and had a sale going on.  I choose an oil cloth design in black and white that looks like Mexican papel picado decorated with birds, flowers, and calaveras (happy dancing skulls a la El Dia de Los Muertos).

 We removed the cushions and Jed sanded the ugly bronze paint off of the seat, tray, and back.  The legs and arms were already in pretty good shape.

 I removed the vinyl covers off of the seat and back, and then laid them out on my oil cloth.

 I cut a big square for each one.  
 Then I trimmed it down to size.  I had to trim it even more so that it would fit well.  

 Meanwhile, Jed painted the tray, seat, and back with a lovely light turquoise.  He had to do 3 coats to get it to look right.

 To recover the seats, I had to carefully stuff the oil cloth behind and under the seat and the back.  Then we hammered the seat and back in.  This was the trickiest part of the whole project.  I got a little frustrated, but persevered so that we could have this lovely creation.  

 What do you think?
 I love it.  

 I love the black and white, the papel picado design, the paint color, everything.  I’m a little obsessed with it, quite frankly.

Fisher loves it too.  
The metal makes a great sound when he bangs his little hands on it, and an even better noise when he bangs his sippie cup.  

 I love using vintage pieces because they are often so much higher quality than plastic crap from Target.  We love Target and have our share of plastic baby stuff, but are happy when we can have something a little more stylish and sturdy to go with the rest of our house.

 If you’ve made it this far, thanks for putting up with the insane amount of pictures in this post.  Like I said, I’m obsessed.

How have you used or repurposed vintage furniture or baby gear?
I’m sharing this project at some great blog parties.  They are listed on my right sidebar.  Be sure to check them out to see tons of awesome crafty ideas.  Thanks for reading.  
I also linked up at the PAINT IT Party at Design, Dining, & Diapers.

Frugal Friday – A Little Fall Color

I like to decorate with natural elements whenever possibly, and I love a fall display. One of the components of our first date was a pumpkin patch, so Jed knows pretty gourds are the way to my heart. He brought home a whole bushel of various pumpkins and cute gourds from his trip to Lubbock last weekend. Thank you, sir. The best part was that he got them all for just $10. Woohoo! I’ve got gourds coming out my ears but our budget didn’t take hit. I’ve put them all over the house and still have a ton to give away.

How do you decorate on a budget?

The Nursery Part 4: The End

Remember this?  This quilt (made by my great-grandmother) was the inspiration for my bright vintage nursery.  You can see the first three installments of the nursery reveal by clicking Part 1, Part 2, or Part 3.  Why did I divide it up so much?  Because 28 pictures was far too much for one blog post.    

I created this ribbon mobile to go over the crib to keep the wee one entertained.  You can read about the creation of it here.  We got the crib on clearance at Target, and the crib sheets, Sleep Sheep, and sweet turtle blanket were shower gifts.  The curtains are also from Target, and I got the Boppy (complete with the organic cover) on clearance at Amazon.  Don’t worry, it is only staying in there temporarily.  The rugs lived in our bedroom for a while, and came from the Second Saturday Sale in Little Rock.  I’ve seen them at boutiques here in town for over $200, but I got them for $20 each.  The crib skirt is my favorite.  It was made by my grandmother for my crib 32 years ago, and is still in great shape.  It is too long, but I just folded it up under the mattress to make it work.  I should have taken a close up picture so you could see the lovely eyelet lace.      

This “bookcase” was a gold plate holder given to me by Michelle, my sister-in-law.  I spray painted it yellow to match the room, and am using it to hold some of the books we’ve received as gifts.  Below you can see the ring full of family tradition ideas that my Dallas shower guests wrote down for me.

And finally, here is Jed’s favorite part of the nursery, the Twilight Turtle.  When you turn it on it projects stars onto the ceiling using real constellations.  He likes to show it off when we bring people back to the nursery.

What is your favorite decorating item?  
What do you like to show off to visitors? 
I’m sharing this post at some great parties.
Check them out on my right sidebar and join in.   

The Nursery Part 3: More Vintage and Hand Painted Touches

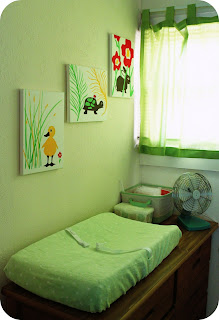
Today I’m showing you another little corner of the nursery.  You can see part 1 of the nursery reveal here, and part 2 here.  I love this little corner.  We used a regular dresser that we already owned, and created a diaper station on top of it.  The changing pad is waaaay bigger than I though it would be, but I guess it is kind of important.  The little canvas basket was a shower gift, and I’m using it to hold diapers, cream, and wipes.

These paintings are my favorite part of the whole nursery.  My friend Crystal, who painted the letters and buckets, also did all three of these for me.  Bunnies and ducks have been inexplicably irresistible to me throughout the whole pregnancy.  These paintings fulfill that craving, but without looking too babyish.  I love them so much.

One of my other favorite touches is this retro fan that I found at an estate sale.  It is totally vintage, fits the color scheme, and is functional.  Isn’t it the cutest?!  
Come back tomorrow for more scenes from the nursery.  
I’m sharing this post at some fun parties.  
Check them out on my right sidebar and join in.