Category: frugal

Frugal Friday: 4 {Very} Basic Meal Planning Tips ~ A Beginner’s Guide

We have been living on one income for a little over one year, and it has been a challenge.  Last week I shared tips on how to set your monthly grocery budget.  You can read more about our budget here and our journey to financial freedom here.  One of the most difficult areas for us is our grocery budget.  There are three of us eating actual food right now, as the Pearl Girl is strictly on the mama milk.

Our monthly food budget is $350.  We take out that much in cash at the beginning of each month and try our best to stay under that amount.  In order to make this happen, we have to meal plan like champs.  Why is meal planning so important when you are on a tight budget?  Having a plan helps me prepare in advance and not end up trying to scramble to throw a dinner together at 5:30.  It helps me to choose budget friendly meals and not end up running for take out because we forgot dinner comes at the same time every day.

I tried using a paid meal planning service (that I won’t name) for free for a blog review, but it wasn’t a good fit for us.  I decided not to write the review because the reason it wasn’t a good fit wasn’t their fault.  The recipes were great, but I am married to a pretty picky eater and mother to a toddler who has very specific preferences.  Let’s just say a meal plan for normal people didn’t work out.  Meal planning isn’t rocket science, but it does take intentional decision making and the willingness to plan ahead.  If this Queen of Procrastination can do it, you can, too.  Here are my very basic meal planning tips to help you on your way.

1) Set Your Grocery Budget – Read more about how to do it in this post.

2) Grab a calendar and start filling in dinners.  Start with your family’s favorites.  Use a month long calendar and fill in as many slots as you can with meals you know how to prepare.

3) Fill in the rest of your meals.  Call your mom and ask for the recipe for a childhood favorite.  Look on Pinterest, Tasty Kitchen, and other recipe sites, but don’t get bogged down and overwhelmed.  Text your friend for her favorite recipes.  Once you have enough filled in for one week you’re off to a great start.  You don’t have to cook like Julia Child every night, but it is fun to mix it up by adding in new things once a week or so.  Add in a vegetarian meal once a week to save money on meat and reduce your environmental impact.

4) Start your list, one week at a time.  Go through each dinner and check to see if you have what you need, then add any missing items to your grocery list.  Next, add in basics for breakfast and lunch.  We keep these items on hand every week: homemade oatmeal, frozen whole grain waffles, English muffins, cream cheese, fresh fruit, Greek yogurt, cereal, eggs, bacon, peanut butter, fruit preserves, honey, cheese, deli meat, and baked chips.

That’s it! You have a meal plan.  I like to plan ahead for the whole month but only shop one week at a time.  I call it a victory when I only have to grocery shop once per week.  Be on the lookout for more meal planning posts coming soon.  Thanks for reading!

Frugal Friday: How to Set Your Monthly Grocery Budget {And Stick to It}

For the past four years, we have followed the Dave Ramsey financial peace plan.  A huge part of this plan is writing down and sticking to a monthly budget.  We tell every dollar where to go, including what we spend on food.  Setting and sticking to a budget is the number one thing you can do to become debt free and find financial freedom.  If you are bogged down by your finances, know that freedom is possible.  We are living proof.  You can read more about our financial story here.  Both of us were once deep in debt and we have now been debt free for almost 4 years.  Today I’m sharing how we set our monthly grocery budget, and a few tips that help us stick to it.  
1) Track your spending.
Before you set your grocery budget, it will be helpful to track your food spending for one month.  Keep you receipts and add up your totals at the end of the month.  Was this a typical month or was your budget off kilter because of guests visiting, birthday parties, etc?  Add or subtract to accommodate those factors.  This will give you a ball park figure to add to your total budget.
2) Create your larger monthly budget.
Your grocery budget is a part of your larger monthly budget.  There are a multitude of budgeting tools out there.  We prefer Dave Ramsey’s Total Money Makeover budget tool.  It takes you through setting up a budget step by step.  If you want to do it on your own, simply write down your total monthly income and start subtracting your expenses.  Account for your tithe or giving, rent or mortgage, utilities, and then groceries, and any debts.  After the essentials you will see what you have left to spend on the non-essentials like dining out, gifts, travel, etc.  You will probably need to tweak the numbers a few time to get everything just right.  Don’t be discouraged if it takes you a few months to get it right.  
3) Take your grocery number set in your larger budget and divide it up.
How much do you usually spend on meat?  We buy meat only when it is on sale and freeze it in individual baggies or in freezer meals.  We also eat at least one vegetarian meal every week to reduce our spending and our environmental impact.  What are your budget busters? Alcohol, fancy cheese, brand name foods, seasonal items… Each week you will want to make sure your basics are covered before you buy a bottle of wine or (in my case) a fancy cheese.  Goat cheese is my love language, y’all.  If you are a soda drinker, wait until they are on sale and stock up.  One month we busted our grocery budget buying Christmas candy.  I’m so not kidding.  
4) Meal Plan 
Write down your dinners for the week and stick to the plan.  I’ll share more about how we plan our meals next week, but know that without a plan it is easy to lose track of your spending.  Some folks use coupons to help them plan, but I have more luck shopping at Aldi.  When we started shopping there it cut our budget by almost 40%.  Seriously.  They aren’t a sponsor of this blog (but the totally should be), we just love the store.  We gave up name brands almost entirely.  There are a few products that truly are better with name brands, so we look for coupons for those favorites.  
5) Use cash envelopes.
Take out the entire monthly grocery budget in cash at the beginning of each month.  Put it in your grocery envelope and take it with you every time you go to the grocery store.  If you run out before the end of the month, try your best to use what you already have on hand and get creative.  Using cash will help you immensely as you try to stick to your budget.  
How do you keep your grocery spending on track? 

Dining Out on a Dime in DFW: Taco Joint

Our family loves delicious food, but we live on a tight budget.  You can read about how we stick to our dining out budget here.  As a result, we love to find fabulous restaurants where we can stretch out dining out dollars and have a fantastic meal at the same time.  I’ll share my finds here on the blog so that you can “dine out on a dime” as well.

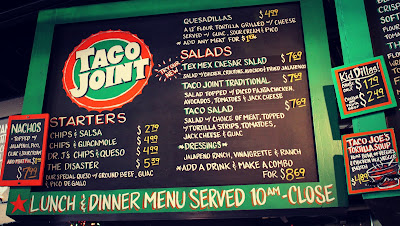
 My husband, Jed, has often stated that he could eat Tex-Mex for breakfast lunch and dinner.  At Taco Joint you can do just that and not spend a fortune.  A family of 4 can eat at Taco Joint for under $20, which is awesome.

  I highly recommend the brisket tacos for $1.99, and you can upgrade to a meal with beans and rice for $8.29.  Friends of mine love the Lester (grilled sirloin) and the Evan (vegetarian).  You can get the “Gaston Grab” for a crowd, 6 breakfast tacos for $11.79.

Taco Joint has 2 locations – 911 N. Peak St and 6434 E. Mockinbird Ln (Mock/Abrams).  The Lakewood location has happy hour from 3-7 pm Monday – Friday and a fun patio.

What’s your go-to restaurant when you want a great meal without spending a ton?  

This is not a sponsored post, and all opinions are my own.

Family Fun in DFW: Beat the Heat at the Children’s Aquarium at Fair Park

We are in the seriously-too-hot-to-live phase of Texas weather, and constantly trying to find ways to keep cool and entertain our family without spending too much or staying glued to the tv.  If you follow me on Instagram, you know that recently we visited the Children’s Aquarium at Fair Park in Dallas and had an absolute blast.  We received free passes in exchange for this review, but all opinions are strictly my own.  We love exploring the city we call home and enriching the lives of our wee ones on the way.  The Aquarium has been around for a long time, but was recently completely redesigned as a Children’s Aquarium.  EVERYTHING is on a child’s level, completely accessible, and perfectly placed to grab their attention.  Bear was enthralled.  He has been talking about the alligator we saw for over a week now.  
Isn’t this jelly fish amazing?
There are two sides to the main aquarium, salt water and fresh, as well as a touch pool, shark tank, and stingray touch pool.  Everything is included in the admission price except for stingray food (if you want to feed them) for and extra $2.  Bear was a little intimidated by the stingrays, so we didn’t try feeding them.  

Spike wants to bite your toes.  Thankfully thick glass protects you from this 190 pound 75 old year old titan snapping turtle.

The jelly fish were truly beautiful to watch.  They float so gracefully like aquatic ballerinas.  It almost made me hate them a little less.  I’ve been stung one too many times.  

The touch pool is surrounded by a step rock formation to make it the perfect height for every kid.  The staff guide was so patient with Bear and showed him shells and sea urchins, helping him touch them gently.

The outdoor shark and stingray tanks were fabulous.  There are several different vantage points to watch the sharks, but this was my favorite as well as Bear’s.  He waited for each shark to swim by and chased it down the glass.  I couldn’t get a non-blurry photo, but it was such a fun memory I had to share.  
If you are a fan of the tv show New Girl, you probably recognize the lion fish.  These beauties were so incredible to watch. 

In my opinion, the best thing about the Children’s Aquarium is the price.  Admission is only $8 for adults, and $6 for kids 3-11 and seniors.  If you have a membership to the Dallas Zoo you get $2 off admission.  An even better deal is the annual membership.  For $20 ($15 for zoo members) you can buy an annual membership and visit any time.  If you’ve checked out the prices on any of the other aquariums in town you know that price is unbeatable.

**Holiday Gift Idea** A season pass would make a perfect gift for the fish loving child in your life.  People (children included) remember experiences far more than material things.  Do you remember what toy you got for Christmas at age 6? Probably not.  But I bet you remember a favorite visit to the zoo, aquarium, or special museum.

I would highly recommend the Children’s Aquarium for families with kids 1 and up.  A visit takes 1-2 hours, depending on your child’s attention span.  The Children’s Aquarium also hosts groups, birthday parties, overnight guests, and summer camps for kids from pre-k through 5th grade.  
Visit the Children’s Aquarium at Fair Park any day of the week from 9 am to 4:30 pm, except for Thanksgiving Day and Christmas.  Click here to visit the Children’s Aquarium website for more information.  For more information about the Dallas Zoo visit their website here.  You can also follow the Zoo and Aquarium on Facebook, Twitter, and Instagram.    
What is your favorite species to see at the aquarium?

Frugal Friday: Four Ways to Stick to Your Dining Out Budget

I get questions all the time about the specifics of our budget.  “How much do we spend on groceries?”  “How much do we set aside for clothes?”  By far the most common question is, “How much do you spend on restaurants?”  The answer is, “Not much.”  Our monthly dining out budget on one income is $70.  That’s it.  Would we love for it to be more?  Of course.  Click on some of my ads and affiliate links and maybe we’ll get to increase it.  Just kidding (but seriously…).  How do we stick to spending only $70 per month on dining out?

1) We don’t go to fancy restaurants.  I have a growing list of great local places and a few chains where we can get a great meal for under $20.  It is possible and a lot easier than you might think.  We would rather have 3-4 meals out a month than one expensive one.  

2) We don’t buy kids’ meals.  The Bear is still a toddler with a varying appetite, and every time we’ve ever bought him a restaurant meal we regret it because he leaves most of it on the plate.  Instead we bring in a sandwich, veggies, fruit, and a sippie cup every time we go out to eat, and offer him some of our meals.  Yes, this takes a little planning on our part.  No, we won’t be able to get away with it forever.  We’ve never had a waiter even ask a question about it, and several have even commented on what a great idea it is.

3) We don’t buy drinks.  Soft drinks and alcohol in restaurants are a total rip off, in my opinion.  Why would we pay $2.99 each for a diet coke?  Crazy town.  Sometimes we break this rule, and when we do Jed and I split a soft drink rather than both getting one.  We get free refills and french kiss each other on the regular, so what’s the big deal?

4) We meal plan.  Before we started budgeting, we spent an outrageous amount of money on restaurants because we were both busy and dinner time would roll around without us having a plan.  We’ve learned that dinner is not an emergency, it comes at about the same time every day.  If we plan out our meals one week in advance we end up spending far less on groceries, making fewer grocery store trips, and eat out far less.  This way we can plan our meals out and make them count rather than have them be a last minute rush decision.

Do you have a budget for dining out each month?  How do you stick to it?

Easy DIY Instagram Magnets {Make 6 for $3}

I heart Instagram.  For ages I used it just to add fun filters to my phone photos but finally started using it socially a few months ago.  Now I’m addicted.  You can follow me on Instagram here.  The big drawback of taking pictures on your phone has always been the difficulty in printing and displaying them in real life.  My friend Sarah who blogs here shared a tutorial for creating Instagram magnets using the Walgreens app, and I thought it sounded like a fabulous idea.  When I went to Joann’s to looks for magnet strips, I found something exciting – a whole magnetic sheet!  I’d never seen one before and thought it would be perfect for this little project.  I used a coupon at both Joann’s and Walgreens so the total cost of this project was only $3 for 6 magnets.  If you print off your pics in a 3×3 format instead of the 4×4 using the app, you could get 12 magnets out of a sheet instead of 6.  Bonus!  Here’s how I did it:

Materials needed:
1 8×12 magnetic sheet (use your mobile craft store coupon)
6 4×4 Instagram prints (or 12 if get them printed 3×3)
Exacto knife or box cutter
piece of cardboard

Make it:
Get your pictures printed through the Walgreens app, or format and print yourself at home.  Strip the adhesive backing off of your magnetic sheet.  This is the hardest part.  That backing was not trying to come off for me.  Lay out your photos on the magnetic sheet.  Put a piece of cardboard underneath to protect your work surface from your cutting implement.  Cut them out.  Done.

These make a fun and very personal gift.  I gave the set of 5 to Jed for Father’s Day to take to his classroom, and saved one for our fridge at home.  My goal is to make these once a month so that we have our Instagrams on display in real life and have a festive fridge.

How do you display your phone pictures?

Be sure to follow me on Instagram at Bare Feet on the Dashboard.  

I love linking my ideas at these blog parties.  Click the links to check them out and find crafty inspiration.  If you’ve never visited a blog party, you will be blown away by the creativity shared and imaginative ideas.
Monday: CraftOManiacMad in CraftsIt’s So Very CheriSew ChattyThe Girl CreativeKeeping It SimpleC.R.A.F.T.Boogie Board Cottage, and Sumo’s Sweet Stuff   
Tuesday: Raising 4 PrincessesThe Kurtz CornerHope StudiosToday’s Creative BlogCoastal Charm, and New Nostalgia 
Wednesday: The Trendy TreehousePolka Dots on ParadeLil Luna, and The Thrifty Home
Thursday: All Things with Purpose, Somewhat SimpleThe Shabby Creek Cottage, and House of Hepworths
Friday: Sugar and SpiceKojo Designs, and The Shabby Nest
Weekends: Tatertots and Jello, Serenity Now, and Candace Creations 

Family Travel: Sharing a Hotel Room with Babies {Without Losing Your Mind}

If you’ve traveled with small children, you know it can be a challenge.  Sharing a hotel room with small people who go to bed early can end with parents exiled to bathrooms and balconies.  Not fun.  I’m a traveler with a gypsy soul, and plan to continue seeing the world with my two wee ones in tow.  We’ve discovered that it is possible to share a hotel room with our small people without losing our minds.  The Bear goes to bed at 7 and turns into a grump if he stays up late, so we try to honor bed time no matter where we are.  Here’s how we do it.

 I apologize for the crappy pictures.  Hopefully you can still get the idea.  You will need a Pack ‘n Play , two blankets, thumb tacks, and the room’s clock radio.  We build a hotel tent around our pack-n-play.  On one ill-fated occasion we used the hotel “crib” at a super nice resort that shall remain nameless.  It resembled something found in an orphanage in Kazakhstan.  Horrible.  We went out the next day and bought a cheap pack-n-play and then donated it to a ministry in the area when we left.  It would have cost $50 to fly with our travel crib from home each way ($100 total) and the cheap-o crib cost $40.  Awesome.

Set up your pack-n-play in the corner of the room.  Plug in your clock radio and set it to a non-station playing only white noise.  Turn it up and place it under the pack-n-play.  Tack your blankets to the ceiling making a tent.  Rock that wee one to sleep and place them in their lovely mini room.  Continue to go about your business in your room, even enjoying your tv or computer on a low volume.  White noise is miraculous, my friends.  Some folks use a wifi monitor and head to the hotel lobby or pool, but that is up to you and your level of comfort.  I go back and forth, but it really depends on the hotel.  We’ve used the hotel tent method in many different venues, and it always works.  We are not co-sleepers, so our kiddos are used to sleeping in their own space.  We use a Twilight Turtle with our older child so the dark isn’t scary.  It may take a few tries to get your child used to the Hotel Tent, but it will be well worth it when you aren’t trapped with your spouse on a bathroom floor.  Your child gets the sleep they need to enjoy the trip and you don’t have to watch a movie in the bathtub.  Everybody wins.  
What are your secrets to traveling with kids?  

Frugal Friday: Confessions of a Gift Wrap Hoarder

Y’all know I love to clean out, clear out, sell stuff, and give it away.
That is still true about most things in my life, with a few exceptions.
Today I’m confessing the ugly truth.
My name is Becca, and I’m a gift wrap hoarder.  
Why do I hoard gift wrap?  I do it because it saves us tons of money at every gift giving holiday, birthday party, baby shower, and wedding.  I rarely spend money on gift wrap.  It started with our wedding five years ago.  If you’ve had one, you know you get tons of presents, all beautifully wrapped, and it seems like such a waste to throw away all those bags and tissue paper.  I started folding it all up neatly and holding on to it.  I moved my collection cross country and 3 times since.  It is totally worth it.  For every shower and birthday I’ve saved at least $3-5 in gift wrap by using my stash.  
At Christmas I buy one roll of brown packing paper from the dollar store and use it to wrap all my box presents.  I tie the packages up with recycled bows from my stash or plain ribbon.  Brown paper packages tied up with string, these are a few of my favorite things.  
I never have to run by Target or the Hallmark Store at the last minute to grab a gift bag, and our presents always look super cute for at no extra cost.  Lots of people don’t keep gift wrap because it takes up space, and quite frankly we live in a disposable culture.  I rack up every Christmas on new gift wrap because no one else can be bothered to keep it.  Oh, I’ll always take it off their hands.  Don’t mind if I do.  
Do you have a gift wrap stash or a frugal gift wrap solution? Share it in the comments section below.       

Frugal Friday: Four Easy Ways to Declutter Your Life {and Make $$}

We are on a mission around here, people.  Every season we make a pile and get rid of stuff.  We sell what we can and donate the rest.  This summer’s declutter sales are motivated by an unexpected loss of summer income.  We thought Jed was going to teach summer school but it was cancelled at the last minute, which means we don’t get several thousand dollars we were counting on.  For today’s Frugal Friday post I’m sharing a few ways we declutter and make a little money at the same time.  Here are the top four ways we clean out our life and make a little cash money…

1) Team Garage Sale – These can be a big money maker, but take a lot of time and effort.  You can make it easier on yourself and more profitable in the long run by joining forces with neighbors or friends to create a much desired “multi family” garage sale.  We are attempting to get a few of our neighbors to go in on one with us.  One house hosts the sale, everybody tags their own stuff and divides up the shifts.  You make the money off whatever sells of your stuff.  Multi family sales draw a bigger crowd, and sharing shifts lightens the work load, so everyone wins.

2) Selling Online – There are lots of online sites that will buy your old junk.  We’ve sold everything from cell phones to DVDs to ink cartridges, and plan to sell more.  I’m cleaning out my old CDs and DVDs to sell right now.  Most of these sites will let you scan or search online to find out how much your stuff is worth before you send it off.

3) Craigslist – This is best reserved for big ticket items, because it takes more effort on your part.  Right now we have a few items listed and Jed is wheeling and dealing to get rid of them.  Take the time to take good pictures and write a detailed description.  Always put your phone number as well as an email address because most buyers prefer texting to emailing.  We like to meet buyers in a neutral place rather than our home to protect ourselves, but that might just be our own paranoia.  Trust your instincts and if the deal feels shady, don’t do it.

4) Donate – If your stuff won’t sell, donate it.  If you don’t need the money but want to get rid of things that are still useful, try Freecycle, Goodwill, or the Salvation Army.  Freecycle is a localized forum for folks to give away almost anything (except services and pets) to keep junk out of landfills.  That old broken computer could be really useful to someone who likes to rebuild them as a hobby.  Don’t throw it away!  Goodwill has donation stations all over the place.  There are probably non-profits in your area that will even come and pick up your junk.  This is a great solution for post-garage sale clutter.

How do you get rid of clutter?  

Duck Creek DIY: Cheap and Easy (But Sturdy) Behind the Couch Shelf

We love our little Duck Creek Ranch – my affectionate pet name for our 70s rancher that sits on a little creek inhabited by ducks and geese.  You can read more about it and our DIY projects here.  Like most houses built in other eras, there are some things about DCR that are just a little weird.  Our living room is lovely and open with lots of light, especially now that we covered the wood paneling with festive yellow and white paint.  The problem is that there is only one place to put our couch.  It can only go in this one corner, and that corner leaves no room for a side table.  I looked for options online and found a few tutorials for behind the couch shelves, but Jed worried they didn’t look sturdy.  When you have a 32 pound toddler climbing on things, they need to be tough.  
Here’s what you need:
1×8 inch board – cut to the length you need (Our’s is 8 ft long.)
paint or stain
3 shelving brackets (made for a 1×8 board)
screws – 9 (3 in) and 6 (1/2 in)
drill 
studfinder
sandpaper
1) Preparation: Sand your board. Prime it.  Sand it again.  Paint it.  Sand it one more time.  Then paint it one last time.  This is only necessary on the top and sides.  On the bottom you can just sand and prime.  All these steps help it to be more durable because you will be putting things on it constantly.

2) Location: Find your studs and attach your L brackets to the stud.  Measure from the floor to the back of the couch to see how high you want your shelf.  Then measure again to be sure.  Check your brackets to make sure they are level once they are attached.  Use your long screws to attach the brackets to the stud.

3) Placement & Finishing: Once your board is dry, place it on the L brackets and use the smaller screw to attach the board to the brackets.  Check to be sure it is level.

4) Be patient.  Let the paint really dry for a few days before you start putting things on it.  Then enjoy your new shelf.  The brackets are made to hold a lot of weight, so don’t be afraid to decorate.  I’m still figuring out what I want to go on the shelf.  You can also use the space between the shelf and couch for storage.

What is your next DIY project?
We’re working on a kids’ picnic table around here.
Click here to see all of our Duck Creek DIY posts. 
We’ll have lots more fun DIY coming your way soon.